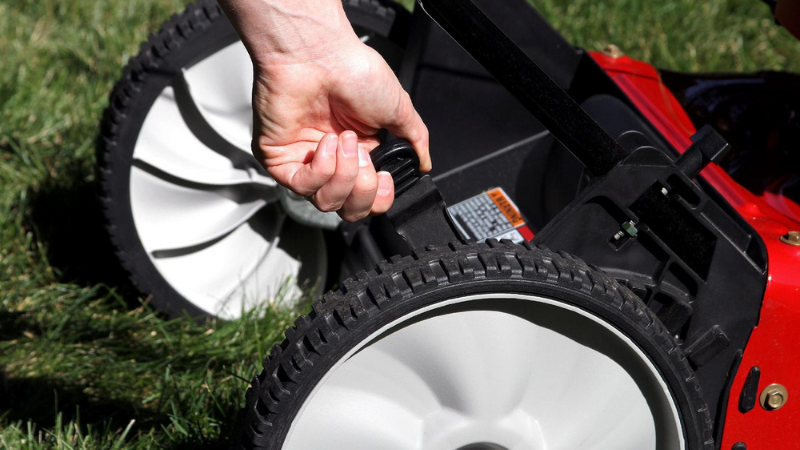
Last summer, I watched my neighbor yank his mower's pull cord about fifteen times before giving up in frustration. The engine cranked but never fired. The culprit turned out to be a worn ignition coil — a small part most gardeners never think about until it fails. If you've ever wondered how lawn mower ignition coil works, you're about to get a clear, practical answer that could save you a lot of wasted effort on mowing day.
The ignition coil is the heart of your mower's spark system. Without it working correctly, the engine has no way to ignite the fuel-air mixture inside the cylinder. It's a compact, deceptively simple component — but understanding what it does and what can go wrong makes diagnosing problems much faster. It also helps to have a broader picture of how a lawn mower engine works overall before diving into a single component.
This guide walks you through the mechanics, testing, replacement steps, real costs, and a few persistent myths worth clearing up. Whether you're deep in gardening tips territory or just trying to keep your lawn in shape, this is one repair worth knowing.
Contents
- How a Lawn Mower Ignition Coil Actually Works
- Step-by-Step: Checking and Replacing Your Ignition Coil
- What Beginners Miss — and What Experienced Users Already Know
- Quick Signs Your Coil Is Failing — and Fast Fixes
- Repair vs. Replace: Breaking Down the Real Costs
- Common Myths About Ignition Coils — Debunked
- Key Takeaways
How a Lawn Mower Ignition Coil Actually Works
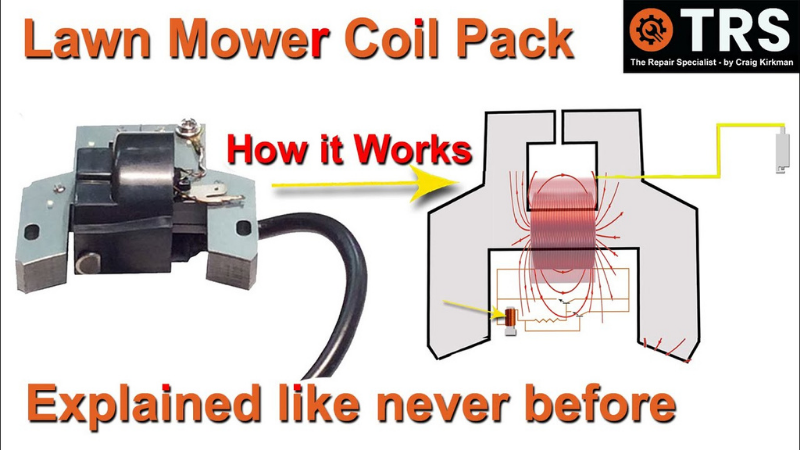
The ignition coil is an electromagnetic transformer that takes low-voltage energy from the spinning flywheel and converts it into the high-voltage surge needed to fire the spark plug. It sounds complex, but the underlying principle is straightforward once you break it into parts.
The Role of Electromagnetic Induction
As the flywheel spins, permanent magnets embedded in it pass close to the coil's iron core. That moving magnetic field induces an electrical current in the coil's primary winding. When the current collapses rapidly, it generates a high-voltage surge in the secondary winding — that's the spark that fires the engine.
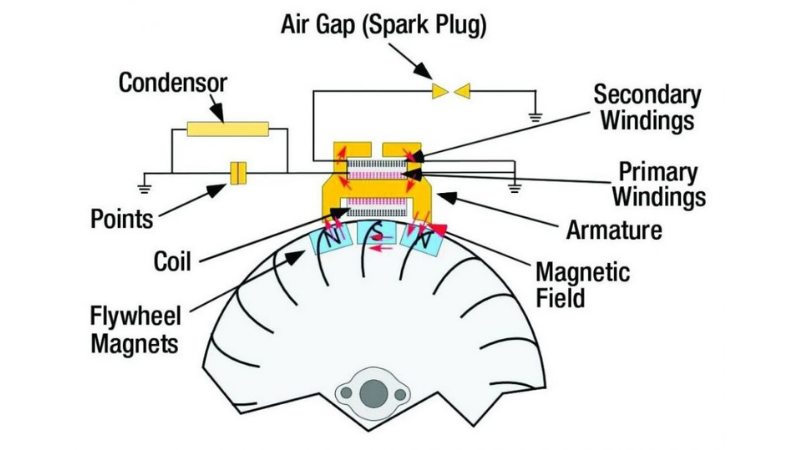
- Primary winding: a few hundred turns of thicker copper wire, carries low voltage
- Secondary winding: thousands of turns of fine wire, produces the high-voltage output
- The turn ratio between the two windings determines how much voltage is multiplied
According to Wikipedia's entry on ignition coils, a typical small engine coil can step voltage up from around 12 volts to 20,000–40,000 volts — more than enough to reliably jump the spark plug gap.
How Voltage Gets Amplified
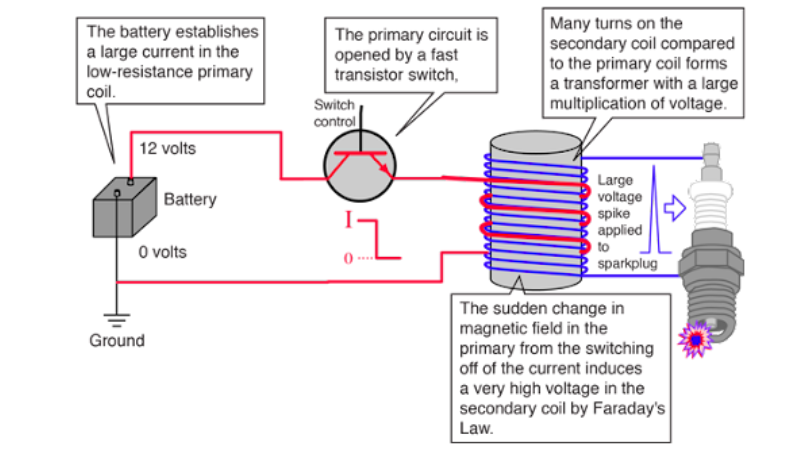
Voltage amplification works through transformer action. Because the secondary winding has vastly more turns than the primary, the voltage multiplies proportionally. That spike travels down the spark plug wire and jumps the gap at the plug tip, igniting the compressed fuel-air mixture at precisely the right moment in the engine cycle.
The Magnetron Ignition System
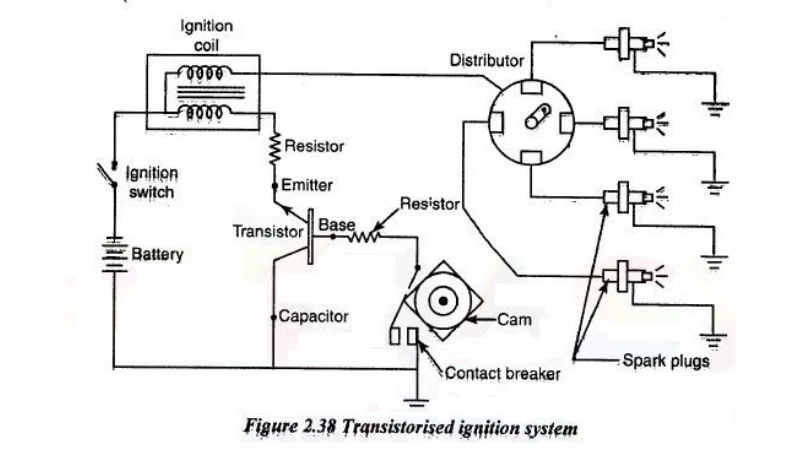
Most modern mowers use a solid-state magnetron ignition module rather than older contact-point systems. A transistor inside the module handles switching — triggering the collapse of the magnetic field at the correct moment without any mechanical contact. This design is more reliable, requires no periodic adjustment, and eliminates the worn points that plagued older mowers.
Step-by-Step: Checking and Replacing Your Ignition Coil
You don't need a fully equipped workshop to diagnose or fix this problem. A basic spark tester (under $10) and a feeler gauge handle most of the job.
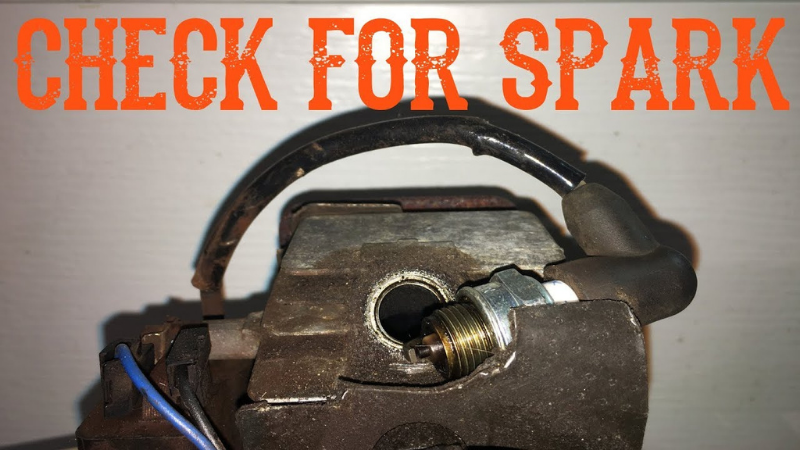
Checking the Coil
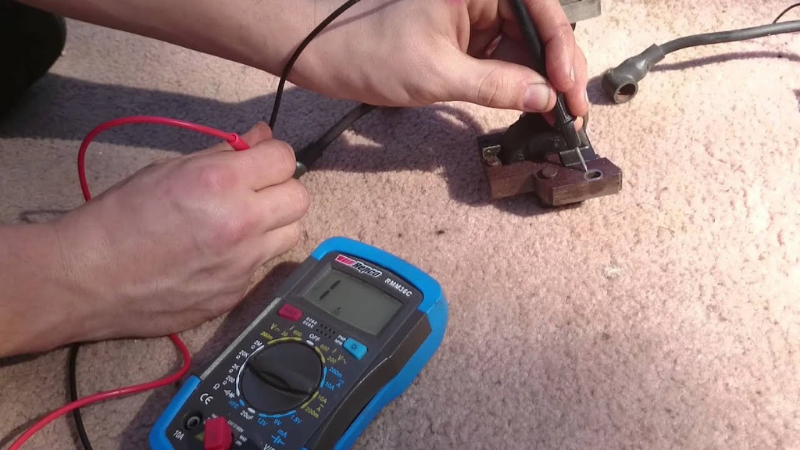
- Disconnect the spark plug wire and attach a spark tester between the wire end and a grounded surface.
- Pull the starter cord briskly. Look for a consistent, bright blue spark.
- A weak orange spark — or no spark at all — points to a failing coil or related ignition problem.
- Measure the air gap between the coil's pole shoes and the flywheel magnets using a feeler gauge. Most small engines call for 0.010"–0.014". An incorrect gap reduces output dramatically.
Safety warning: Always disconnect the spark plug wire before working near the flywheel — one accidental pull-start can cause a serious injury.
Replacing the Coil
- Turn off the ignition switch and let the engine cool completely before touching anything.
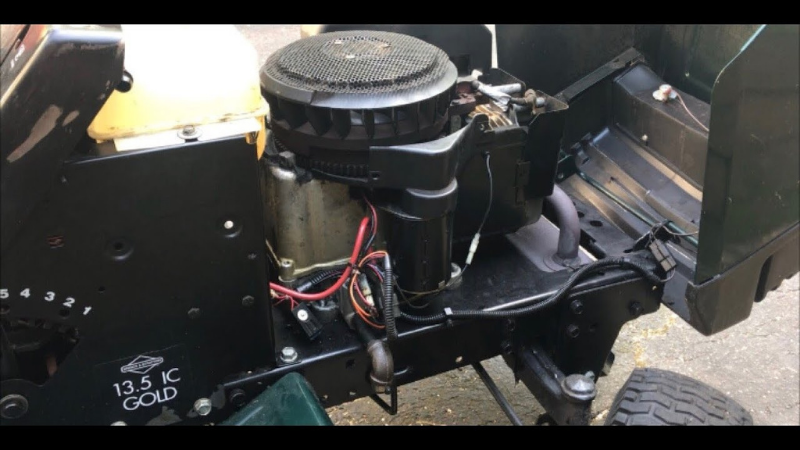
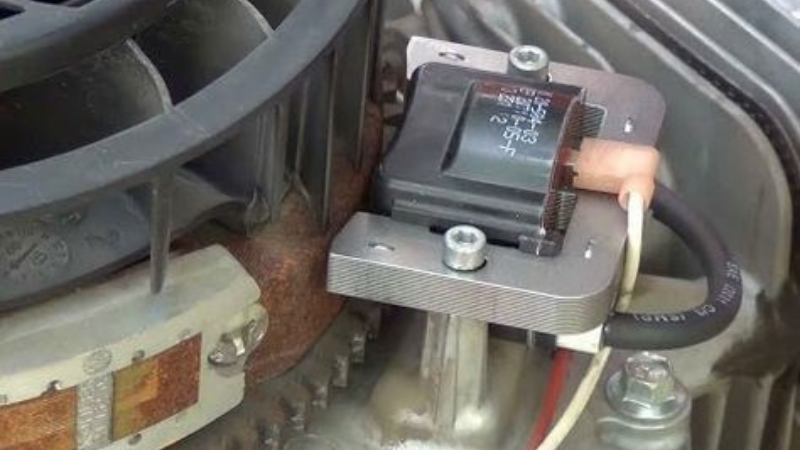
- Remove the engine cover — typically two or three bolts — to access the coil mounted near the flywheel.
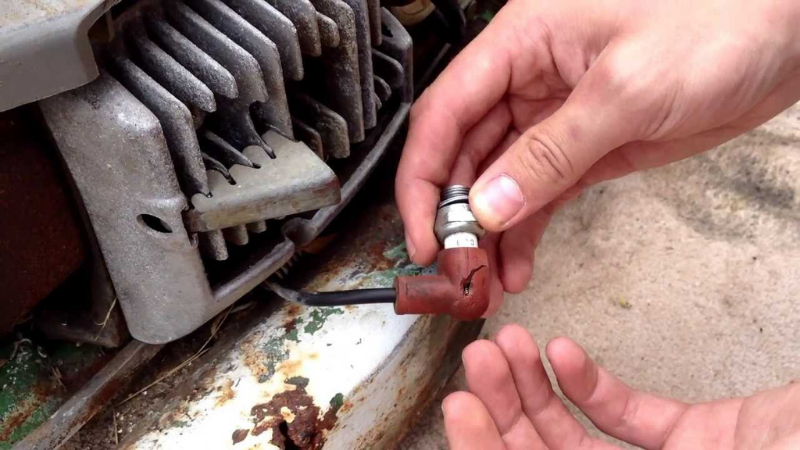
- Disconnect the kill wire (the thin wire grounding the coil to the engine). This is the stop circuit.
- Remove the two mounting bolts holding the coil to the engine block.
- Apply a thin film of dielectric grease to the new coil's terminals if recommended by the manufacturer.
- Position the new coil. Slip a business card or feeler gauge between the coil's pole shoes and the flywheel magnets to set the correct air gap, then tighten the mounting bolts.
- Reconnect the kill wire, reattach the spark plug wire, and do a test pull to confirm a strong spark before reassembling the cover.
This repair is within reach for most home gardeners. If you're already comfortable checking fluid specs — like the Honda 160cc oil capacity — replacing an ignition coil is a natural next step.
What Beginners Miss — and What Experienced Users Already Know
If You're Just Starting Out
Most beginners assume a no-start condition points to fuel or battery problems. The ignition coil rarely gets a first look. Before you pull your coil, make sure you understand these fundamentals:
- Coils don't always fail suddenly — many degrade gradually and cause intermittent misfires before quitting completely
- A coil that works fine when cold may fail once the engine reaches operating temperature — this is the most common failure pattern
- Always check the spark plug first. A fouled or worn plug produces symptoms nearly identical to a bad coil. Our guide on what causes a spark plug to turn black covers this in detail
- The kill wire shorts the coil to ground when you release the handle. If that wire is broken, the engine won't stop — it won't affect starting, but it's a safety issue
What Experienced Users Do Differently
If you've been servicing your own mowers for years, you know that engine brand and model matter. For instance, the ignition coil specs differ between engine platforms — the differences between Kawasaki FR and FS engines affect which replacement coil is compatible. Experienced users also apply these habits:
- Always verify the air gap with a feeler gauge — never eyeball it
- Test the coil both cold and again after 10–15 minutes of running to catch heat-related failures
- Inspect the flywheel key before replacing the coil — a sheared key shifts ignition timing and causes identical symptoms at a fraction of the cost to fix
- Replace the spark plug alongside the coil to eliminate variables from your diagnosis
Quick Signs Your Coil Is Failing — and Fast Fixes
Recognizing early coil symptoms can save you from a breakdown mid-mow. Here's what to watch for.
Common Symptoms
- No spark at the plug — the most direct indicator
- Engine cranks but refuses to start
- Starts fine when cold but stalls after warming up
- Rough running or misfiring under load
- Backfiring through the exhaust
What Actually Causes Coils to Fail
- Heat damage — repeated thermal cycling breaks down the coil's internal insulation over seasons
- Vibration — loosens internal connections over time, especially on rough terrain
- Moisture — corrodes the kill wire terminal or the coil body itself
- Incorrect air gap — set too wide or too narrow, spark output drops significantly
- Age — most coils last 5–10 years under normal use before gradual degradation begins
Keeping your overall mower in good shape reduces unnecessary stress on the ignition system. General yard upkeep — like knowing whether grass clippings make good fertilizer and managing your lawn efficiently — means fewer long mowing sessions that push an aging coil over the edge.
Repair vs. Replace: Breaking Down the Real Costs
Whether you fix it yourself or hand it off to a shop, the costs are manageable. Here's an honest look at what you're dealing with.
Ignition Coil Cost Comparison
| Option | Average Cost | DIY Difficulty | Time Required |
|---|---|---|---|
| OEM replacement coil | $20–$60 | Moderate | 30–60 minutes |
| Aftermarket coil | $10–$30 | Moderate | 30–60 minutes |
| Professional shop repair | $80–$150 total | None (paid service) | 1–3 days turnaround |
| Spark tester (tool) | $7–$15 | Easy | 5 minutes to test |
| Feeler gauge (tool) | $5–$12 | Easy | 2 minutes to set gap |
Should You DIY or Pay a Pro?
This decision comes down to your comfort level with small engine work. Both sides have merit.
DIY advantages:
- Saves $60–$100 in labor costs
- Builds skills you'll reuse across future mower repairs
- No waiting for a shop appointment — you control the timeline
Reasons to hire a pro:
- If the flywheel or engine shows additional damage beyond the coil
- If the mower is still under a manufacturer warranty
- If you're uncomfortable working around rotating engine components
If you're already handling your own lawn care tasks — from using spreaders responsibly to managing basic garden maintenance as a beginner — the DIY coil replacement is well within your reach and well worth learning.
Common Myths About Ignition Coils — Debunked
There's a lot of outdated or just plain wrong advice floating around about ignition coils. Here are four myths worth clearing up before you spend money or time on the wrong fix.
Myth: A Failing Coil Always Means a No-Start
Not true. A coil in early failure often causes intermittent misfires, rough idling, or stalling under load — sometimes for an entire season — before it stops producing spark entirely. If your mower runs rough but still starts, don't rule out a weakening coil.
Myth: A Multimeter Test Is Enough
Resistance testing with a multimeter gives you a baseline reading, but it won't catch heat-related failures. A coil can read perfectly within spec at room temperature and fail completely once the engine reaches operating temperature. Always use a spark tester under real running conditions for a reliable diagnosis. This is the same principle behind testing a spark plug for black fouling — visual and functional tests tell you more than numbers alone.
Myth: Aftermarket Coils Are Always Inferior
OEM coils are reliably built, but many aftermarket options — especially those manufactured to OEM specifications — perform equally well and cost significantly less. The key is checking reviews specific to your engine model and brand. For common engines like Briggs & Stratton or Tecumseh, aftermarket coils have a long track record. Similar principles apply when choosing any replacement part, whether for mower mechanics or lawn spreaders — brand name doesn't always mean best value.
Myth: No Spark Always Means the Coil Is Bad
No spark has multiple possible causes. Before replacing the coil, rule out these cheaper culprits first:
- Fouled or worn spark plug
- Broken or shorted kill wire (grounds the coil permanently)
- Sheared flywheel key (shifts ignition timing)
- Faulty safety switch under the seat or operator bail handle
Working through this checklist systematically saves you from buying a coil you didn't need.
Key Takeaways
- The ignition coil converts low-voltage flywheel energy into the high-voltage spark your engine needs — a solid-state magnetron module handles this reliably with no moving parts to wear out.
- Most coil replacements are a DIY-friendly job costing $10–$60 in parts and taking under an hour with basic tools.
- Heat-related failure is the leading cause of coil problems — always test a suspect coil both cold and at operating temperature to confirm the diagnosis.
- Rule out a fouled spark plug, sheared flywheel key, and faulty kill wire before assuming the coil itself is the problem.


About Lee Safin
Lee Safin was born near Sacramento, California on a prune growing farm. His parents were immigrants from Russia who had fled the Bolshevik Revolution. They were determined to give their children a better life than they had known. Education was the key for Lee and his siblings, so they could make their own way in the world. Lee attended five universities, where he studied plant sciences and soil technologies. He also has many years of experience in the U.S. Department of Agriculture as a commercial fertilizer formulator.
Get FREE Gardening Gifts now. Or latest free toolsets from our best collections.
Disable Ad block to get all the secrets. Once done, hit any button below