Have you ever gone to prune your garden and watched the shears tear through a stem instead of cutting cleanly? That's what happens when blades go dull — and it's more common than most gardeners realize. The fix is simple: you can sharpen pruning shears at home in about 10 to 15 minutes using a few basic tools you likely already own. If you're already putting effort into solid gardening practices, keeping your shears sharp is one of the highest-impact habits you can build.

Dull blades don't just slow you down — they actively harm your plants. Instead of slicing cleanly, dull shears crush and tear stem tissue. That damage heals more slowly and leaves plants vulnerable to fungal infections and disease. According to Wikipedia's overview of pruning, clean cuts are essential for minimizing plant stress and preventing the spread of pathogens. Whether you're trimming herbs like tulsi grown outdoors or managing flowering plants like periwinkle, a sharp blade makes a real difference in how your plants recover and grow.
This guide walks you through every step: cleaning, rust removal, sharpening, and lubricating. You'll also find a cost breakdown, pro tips, real garden scenarios where blade quality matters most, and a long-term routine so you're never caught with a badly dull pair again.
Contents
- How to Sharpen Pruning Shears at Home: Step-by-Step
- Safety and Prep: Best Practices Before You Begin
- What You'll Spend: A Budget Breakdown
- Pro Tips for a Sharper, Longer-Lasting Edge
- When Dull Blades Actually Cost You More
- Common Myths About Sharpening Pruning Shears — Busted
- A Maintenance Routine to Keep Your Shears Sharp Long-Term
- Frequently Asked Questions
How to Sharpen Pruning Shears at Home: Step-by-Step
This is the core process. Follow these steps in order, and you'll end up with shears that cut cleanly and confidently every time you pick them up.
What You'll Need
Before you start, gather your supplies. Most of these items are inexpensive and reusable across many seasons:
- Flat-head screwdriver or small wrench (for disassembly)
- Combination sharpening stone or diamond file (coarse and fine sides)
- Steel wool or medium-grit sandpaper (for rust removal)
- Rubbing alcohol or a 1:9 bleach-to-water solution (for disinfecting)
- Soft cloth or rag
- Camellia oil or mineral oil (for lubrication)
- Cut-resistant safety gloves

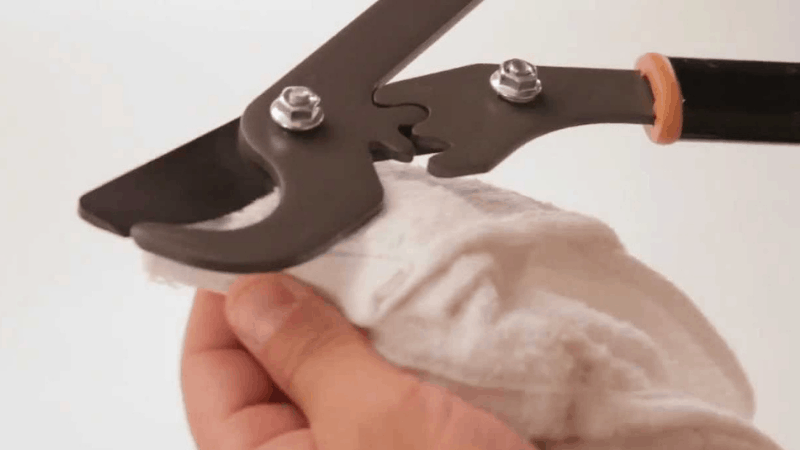
Step 1 — Disassemble and Clean
Most bypass pruners (the type where two blades cross like scissors) have a single central bolt. Loosen it with a screwdriver and separate the blades. Once apart, wipe each blade thoroughly with a cloth dampened with rubbing alcohol. This removes sap, soil, and plant residue that could clog your sharpening stone or scratch the blade surface during the next steps.
Always disassemble your shears before sharpening — working on assembled blades increases your risk of injury and makes it much harder to maintain a consistent sharpening angle across the whole blade.
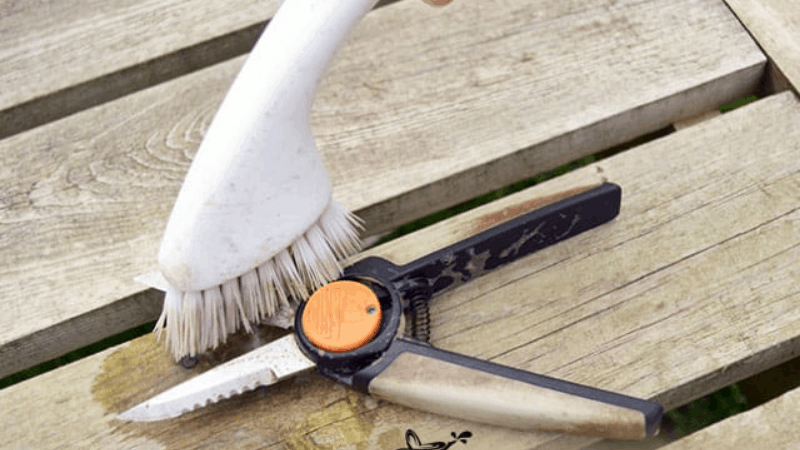
Step 2 — Scrub Off Residue
If your blades have sticky sap or heavy buildup, a simple wipe won't be enough. Work through this short process:
- Mix warm water with a few drops of dish soap in a small bowl.
- Use a stiff brush or steel wool to scrub the flat surfaces of each blade.
- Rinse under running water and dry completely with a cloth.
- Never leave the blades wet — moisture accelerates rust and can damage the metal.
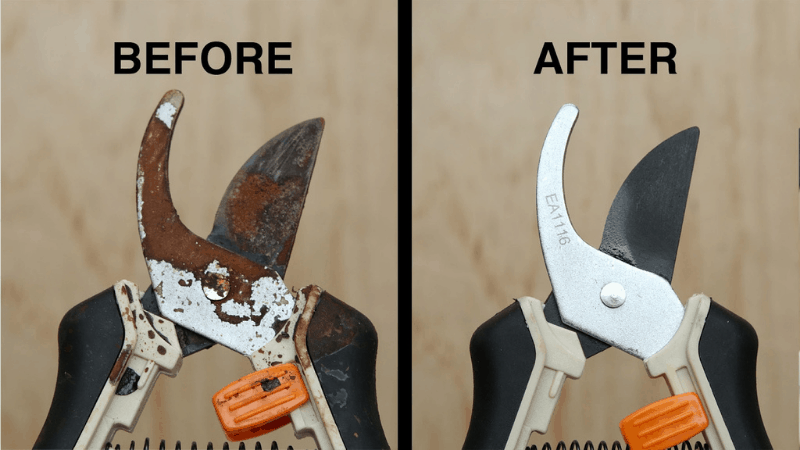
Step 3 — Remove Rust
Rust is common on garden tools stored in damp sheds or left out after use. It's usually easy to fix:
- Apply WD-40, a dedicated rust remover, or a thick paste of baking soda and water to the rusted areas.
- Let it sit for 5 to 10 minutes to loosen the oxidation.
- Scrub with steel wool or medium-grit sandpaper, working along the length of the blade — not across it.
- Wipe away all loosened residue with a dry cloth.
- Repeat if the rust is heavy or has been there a long time.
Once rust is removed, the blade surface should feel smooth and even — ready for the sharpening step.
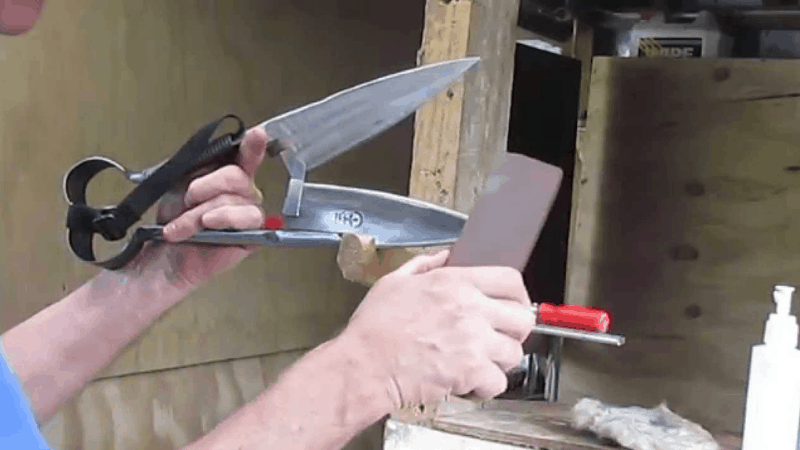
Step 4 — Sharpen the Blade
Pruning shears have only one beveled (angled) edge — that's the side that does the cutting. The opposite side is flat and should stay flat. Never sharpen the flat side or you'll ruin the blade geometry.
- Put on your cut-resistant gloves before handling the exposed blade.
- Hold the blade steady and match the angle of your sharpening stone to the existing bevel — usually 10 to 20 degrees.
- Push the stone along the beveled edge from base to tip in one smooth, continuous stroke.
- Repeat 10 to 15 strokes on the coarse side of your stone.
- Switch to the fine side and repeat 5 to 8 strokes for a polished, smooth edge.
- Test sharpness by lightly dragging your thumb across (never along) the edge — it should feel noticeably sharper than when you started.

Step 5 — Lubricate and Reassemble
After sharpening, oil the blade before putting everything back together. Oil prevents rust from forming and keeps the pivot action smooth.
- Use a cloth or cotton swab to apply a thin coat of oil along both sides of the blade.
- Add a small drop of oil directly to the pivot joint.
- Reassemble and tighten the bolt until the blades move smoothly with no side-to-side wobble.
- Open and close the shears several times to spread the oil evenly through the joint.
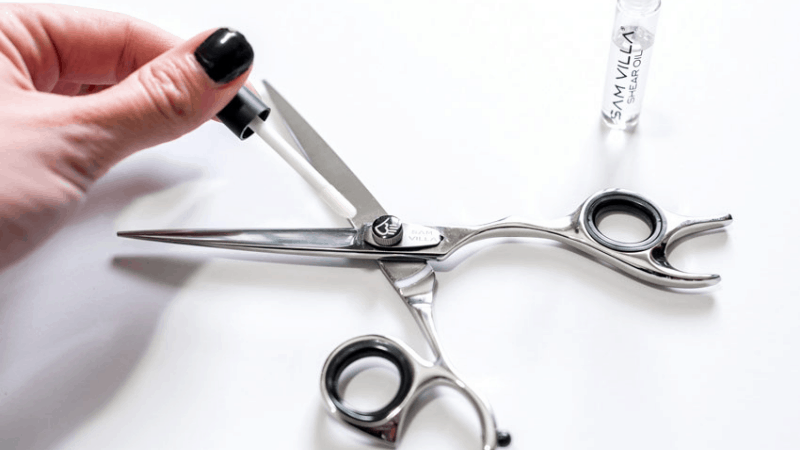

Camellia oil is a favorite among experienced gardeners. It's food-safe, long-lasting, and doesn't go rancid over time. Mineral oil is a solid budget alternative. Avoid vegetable cooking oils — they break down, go rancid, and can leave a sticky film on your blades.
Safety and Prep: Best Practices Before You Begin
Protect Your Hands and Eyes
Sharpening exposes you to metal filings, sharp edges, and occasionally flying debris. A few simple precautions protect you:
- Always wear cut-resistant gloves when handling blades directly.
- Add safety glasses if you're using a power tool or pressing firmly with a file.
- Work on a stable, non-slip surface — a rubber mat on a workbench works well.
- Never point a blade toward your body while filing or scrubbing.
Disinfect Before and After Every Session
Your blades can carry plant pathogens (disease-causing organisms like bacteria and fungal spores) from one plant to another without you realizing it. To prevent this:
- Wipe blades with rubbing alcohol or a 1:9 bleach-to-water solution before sharpening.
- Repeat the wipe-down after reassembly, before your first cut.
- Let the blades air-dry for about 30 seconds — the solution doesn't need to be rinsed off.
This is especially important if you grow sensitive or disease-prone plants. If you're tending aloe vera outdoors, for example, a quick disinfection step between plants can stop fungal problems from spreading before they take hold.
What You'll Spend: A Budget Breakdown
DIY vs. Professional Sharpening: What Makes Sense?
Professional sharpening services charge $10 to $20 per pair of shears. That cost compounds quickly if you have multiple tools or sharpen a few times per season. A basic home sharpening kit costs roughly the same as two professional sessions — and lasts for many years of regular use.
| Item | Estimated Cost | Reusable? | Notes |
|---|---|---|---|
| Combination sharpening stone | $8–$20 | Yes | Coarse + fine sides; lasts for years |
| Diamond file | $5–$15 | Yes | Good for tight blade angles and hard steel |
| Steel wool / sandpaper | $2–$5 | Partially | Replace when worn through |
| Camellia or mineral oil | $6–$15 | Yes | One bottle lasts many seasons |
| Rust remover or WD-40 | $4–$10 | Yes | For tools stored in damp conditions |
| Cut-resistant safety gloves | $5–$12 | Yes | Look for ANSI cut-level A2 or higher |
Your total starter kit costs roughly $20–$35. After the initial investment, ongoing costs are minimal — just occasional steel wool or sandpaper replacements. It's the same logic as investing in your own homemade compost: the upfront effort pays off quickly compared to buying or outsourcing repeatedly.
Pro Tips for a Sharper, Longer-Lasting Edge
Match Your Sharpening Tool to the Blade Type
Not every sharpening tool works well on every blade shape. Using the right one saves time and gives a better result:
- Bypass pruners (scissor-style, two overlapping blades): Use a flat whetstone or flat diamond file.
- Anvil pruners (one blade presses against a flat plate): Use a flat stone on both sides — both edges are beveled.
- Loppers (long-handled for thick branches): Use a tapered round file to follow the curved blade shape.
Prioritize Angle Consistency Over Pressure
The angle of your strokes matters far more than how hard you press. Even a 5-degree shift mid-session creates an uneven edge that dulls faster than a properly shaped one. If you struggle to hold a steady angle freehand, a sharpening guide — a small clamp that locks the tool at a fixed angle — costs about $5 to $10 and removes the guesswork entirely.
Test Before You Oil and Reassemble
Always test the edge before lubricating and putting everything back together. Two quick methods work well:
- Paper test: Slice through a sheet of plain paper. A sharp blade cuts cleanly with no tearing or dragging.
- Light test: Hold the blade up to a light source at eye level. A sharp edge seems to vanish; a dull edge reflects a visible line of light along its length.
When Dull Blades Actually Cost You More
Dull shears don't just make your work harder. They can trigger a chain of problems that take far longer to fix than the original sharpening would have taken.
Disease Spread Through Torn Cuts
A torn stem doesn't seal neatly. The ragged wound stays open longer and attracts fungal spores and bacteria. If you move from plant to plant without clean, sharp shears — especially when pruning a collection of tomatoes grown indoors under grow lights where conditions are already humid — you can spread disease between healthy plants without realizing it. Sharp blades, kept clean, are your first and simplest line of defense.
The Hidden Cost of Plant Recovery
When plants get infected after poor cuts, the remediation work stacks up fast. You might end up mixing homemade treatments to fight off fungal growth or pests, removing entire branches, or losing plants you've spent months developing. A 10-minute sharpening session — done before the problem starts — costs far less in time, effort, and materials than treating an infected plant after the fact.
Common Myths About Sharpening Pruning Shears — Busted
"New Shears Don't Need Sharpening Right Away"
Factory sharpening varies a lot by brand and price point. Some premium shears arrive razor-sharp. Others are "sharp enough to sell" but not at optimal performance. After even a few heavy cuts on woody stems, a quick 5-stroke pass with a fine stone can restore the edge. Don't wait until the shears feel obviously dull — small, frequent touch-ups are easier than recovering a badly worn blade.
"You Need Professional Equipment to Get a Good Edge at Home"
A bench grinder gives a perfect edge quickly, but it's complete overkill for garden shears used at home. A $10 combination whetstone or an $8 diamond file does the job just as well for typical pruning use. Consistent technique matters far more than expensive equipment. The tools are simple; the skill is in the steady angle and smooth strokes.
"Sharpening Too Often Wears Down the Blade Too Fast"
This concern applies mainly to power grinding tools, which remove metal aggressively. Hand sharpening with a stone removes a tiny amount of material per session — usually less than a tenth of a millimeter. Done regularly, it maintains the blade's shape without meaningfully shortening its life. In practice, blades that receive frequent small touch-ups outlast blades that are left to go badly dull and then ground down aggressively to recover their edge.
A Maintenance Routine to Keep Your Shears Sharp Long-Term
The easiest way to keep shears performing well is to build a simple routine — so you're never starting from a neglected, badly dull blade. Small consistent effort is always easier than a big recovery job.
After Every Use
- Wipe blades with a dry cloth or lightly oiled rag.
- Remove visible sap or debris with a stiff brush.
- Store shears in a dry location, blades slightly open to prevent moisture buildup at the joint.
- Avoid storing them in an enclosed toolbox with other damp tools.
Once a Month During Active Use
- Do a quick sharpening pass — 5 to 8 strokes with a fine stone is all it takes for a maintained blade.
- Check the pivot bolt and tighten if it feels loose.
- Apply a small drop of oil to the pivot joint and work it in by opening and closing the shears.
- Inspect the blade for chips or nicks that may need extra attention with the coarse side of your stone.
At the Start and End of Each Season
- Run through the complete clean-sharpen-lubricate cycle from the step-by-step section above.
- If your shears have been used on thick, woody stems, start with the coarse side of your stone before moving to the fine side.
- If storing for several months, disassemble the shears, coat both blades lightly with oil, and wrap them in a dry cloth before putting them away.
Well-maintained tools take less effort to use, perform better, and last far longer. It's the same logic behind any long-term garden strategy — like the time you put into building lasting weed control habits. Small, consistent effort beats occasional big fixes every single time.
Frequently Asked Questions
How often should I sharpen my pruning shears?
During active gardening season, aim to sharpen every two to four weeks if you're using them regularly. Light users can often get by with two or three sharpening sessions per season. A quick maintenance pass with a fine stone takes under five minutes once you're comfortable with the process.
What is the best tool for sharpening pruning shears at home?
A flat diamond file or a combination whetstone with coarse and fine sides works well for most home gardeners. Diamond files are more durable and cut faster; whetstones give a finer, smoother finish. Either option costs under $20 and will handle years of regular sharpening sessions.
Do I have to disassemble my shears to sharpen them?
You don't have to, but it's strongly recommended. Taking the shears apart gives you full access to each blade independently, which makes it much easier to hold the correct angle and get a consistent, even edge. Sharpening assembled shears is harder to do accurately and can increase your risk of a lopsided result.
What oil works best on pruning shears?
Camellia oil is widely recommended — it's food-safe, rust-resistant, and doesn't go rancid over time. Mineral oil is a practical, affordable alternative. Avoid vegetable cooking oils since they break down and turn sticky, and skip heavy petroleum-based greases if you're cutting near edible plants or herbs.
How do I know when my shears are sharp enough?
Try the paper test: hold a sheet of plain paper in one hand and slice through it with the blade. A properly sharp blade cuts cleanly with no tearing or dragging. You can also test by snipping a thin green stem from your garden — sharp shears slice through in one light squeeze with no crushing or tearing of the tissue.
Can I sharpen pruning shears that are heavily rusted?
Yes, in most cases you can. Start with a rust remover or WD-40 and steel wool to work through the surface oxidation, then move on to your sharpening stone. Deep rust pitting may require extra passes with a coarser abrasive before you can get a clean edge. If the blade is cracked, deeply pitted through to the core, or the pivot mechanism is broken, replacement is likely more practical than repair.
A sharp blade is the simplest, most overlooked act of care you can give your garden — and your plants will show you the difference.


About Lee Safin
Lee Safin was born near Sacramento, California on a prune growing farm. His parents were immigrants from Russia who had fled the Bolshevik Revolution. They were determined to give their children a better life than they had known. Education was the key for Lee and his siblings, so they could make their own way in the world. Lee attended five universities, where he studied plant sciences and soil technologies. He also has many years of experience in the U.S. Department of Agriculture as a commercial fertilizer formulator.
Get FREE Gardening Gifts now. Or latest free toolsets from our best collections.
Disable Ad block to get all the secrets. Once done, hit any button below