When you turn the key and hear a click instead of an engine roar, why is my lawnmower clicking has a clear answer in the vast majority of cases: your starting circuit has failed to deliver enough current. The sound — whether a single loud clunk or a rapid-fire stutter — is your solenoid telling you it can't push enough amperage through to spin the starter motor. The engine hasn't failed. The electrical system has.
That distinction matters. Homeowners who assume the worst — seized engine, blown starter motor — often spend money on parts they don't need. The clicking sound is actually useful diagnostic information. It narrows the problem to three suspects: the battery, the starter solenoid, or the wiring connections between them. Work through those three in order, and you'll solve the problem the overwhelming majority of the time.
Before diving into diagnostics, it helps to know your equipment. Whether you run a basic push mower or a full-size riding tractor, the electrical starting circuit operates on the same principles. Every check you'll do here applies across the board. Browse our gardening tips section for more lawn care fundamentals that keep your outdoor space running smoothly season after season.
Contents
- Simple vs. Complex: What the Click Is Actually Telling You
- Lawnmower Clicking Myths You Should Stop Believing
- Tools You Need to Diagnose the Click
- Diagnosing the Clicking Sound: A Systematic Approach
- When to Fix It Yourself — and When to Stop
- How to Test and Replace a Faulty Starter Solenoid
- Clicking Patterns and What Each One Means
- Frequently Asked Questions
- Key Takeaways
Simple vs. Complex: What the Click Is Actually Telling You
The clicking sound from a lawnmower falls into two distinct categories, and the category determines your diagnostic path. Most people treat clicking as a single problem. It isn't. The sound type, the frequency, and the timing all carry specific information about which component has failed. Reading the click correctly cuts your diagnostic time in half.
The Single Click: What It Points To
A single loud click — often described as a "clunk" — when you turn the key almost always points to the starter solenoid. The solenoid is an electromagnetic switch that bridges the gap between the battery and the starter motor. When it activates correctly, it produces a solid engagement that spins the engine. When it fails, you get one sharp click and nothing else.
The solenoid can fail in several ways:
- Internal contacts burned or corroded beyond conductivity
- The plunger mechanism stuck in the disengaged position
- Insufficient voltage reaching the solenoid from the battery
- A ground connection that's loose or corroded at the solenoid mounting point
Rapid Clicking: The Battery Signature
Rapid clicking — five, ten, or twenty clicks in quick succession — is the battery's distress call. When battery voltage drops below roughly 12 volts, the solenoid can partially engage but lacks the sustained current to keep the starter motor spinning. It clicks, drops out, clicks again, and repeats the cycle until the battery is too depleted to click at all.
If your lawnmower battery is dying consistently, this clicking pattern will become a recurring problem rather than a one-time event. A battery that clicks today and starts tomorrow after a charge is a battery that's near end-of-life. That pattern is a clear signal — don't ignore it.
Lawnmower Clicking Myths You Should Stop Believing
There's a lot of bad advice circulating about lawnmower clicking — advice that sends people down expensive rabbit holes. Knowing what clicking is not saves you time and money before you start replacing parts.
Myth: The Engine Is Seized
The most common false conclusion is that clicking means the engine has seized. A seized engine produces no clicking at all — because the starter motor physically cannot rotate the crankshaft. Clicking is an electrical event, not a mechanical one. If you can turn the engine over manually with a wrench on the crankshaft bolt, the engine is not seized. Verify this before assuming the worst — a simple manual rotation test takes 30 seconds and rules out the most feared failure.
Myth: It Must Be a Fuel Problem
Clicking has nothing to do with fuel delivery. A mower with an empty tank, a clogged carburetor, or a fuel system problem won't click — it will crank but fail to fire. If you're hearing a click and no crank, your carburetor is not the culprit. Issues like a lawnmower carburetor leaking gas or fuel leaking from the carb body produce completely different symptoms: the engine turns over but won't sustain ignition, and you'll smell raw fuel. Clicking skips the crank entirely — meaning the starter motor never even tries. Keep fuel diagnostics and electrical diagnostics in separate mental categories, and you'll avoid wasted effort.
Tools You Need to Diagnose the Click
You don't need a fully equipped workshop to diagnose a clicking lawnmower. A handful of basic tools covers every test in this guide. Having them ready before you start prevents back-and-forth trips that interrupt your diagnostic flow.
Essential Diagnostic Tools
- Digital multimeter — for measuring battery voltage and testing solenoid continuity; this is the single most important tool in your kit
- Wire brush or battery terminal cleaner — for removing corrosion from terminal posts
- Wrench set (10mm, 13mm most common) — for disconnecting battery cables and solenoid terminals
- Jump cables or a smart battery charger — for testing whether a full charge resolves the clicking
- Electrical tape and a marker — for labeling wires before disconnecting them
- Work gloves and safety glasses — non-negotiable when working near a 12V battery under load
Quick-Reference Diagnostic Table
| Clicking Pattern | Most Likely Cause | First Test | Typical Fix |
|---|---|---|---|
| Single loud click, no crank | Faulty starter solenoid | Solenoid bypass test | Replace solenoid ($15–$40) |
| Rapid repeated clicking | Weak or dead battery | Multimeter voltage reading | Charge or replace battery |
| Click + grinding noise | Worn starter drive gear | Inspect flywheel ring gear | Replace starter or ring gear |
| Click only when engine is warm | Heat-expanded solenoid contacts | Cold vs. warm comparison test | Replace solenoid |
| No click at all | No power reaching solenoid | Check fuse and ignition switch | Replace fuse or ignition switch |
Diagnosing the Clicking Sound: A Systematic Approach
Systematic diagnosis eliminates guesswork. Work through the battery first, the connections second, and the solenoid third. This sequence is ordered by cost and complexity — the cheapest and easiest check always comes first.
Step One: Evaluate the Battery
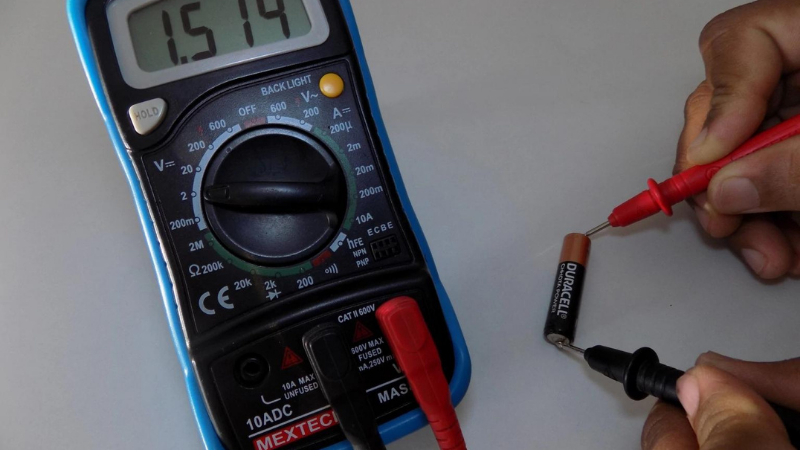
Set your multimeter to DC voltage. Touch the red probe to the positive terminal and the black probe to the negative. A healthy, fully charged 12V battery reads between 12.6 and 12.8 volts at rest. Anything below 12.0 volts at rest means the battery is significantly discharged. Below 11.5 volts, the battery cannot reliably engage the starter motor — which is precisely why you're hearing clicks instead of cranking.
Charge the battery fully and retest. If it climbs to 12.6V during charging but drops back below 12.0V within 24 hours with no load applied, the battery has internal cell damage and needs replacement — not another charge cycle. Also inspect both terminals for white or blue corrosion buildup before drawing any conclusions. A corroded terminal adds resistance even when voltage is adequate, and cleaning it may resolve the clicking without any further repair.

Step Two: Test the Solenoid
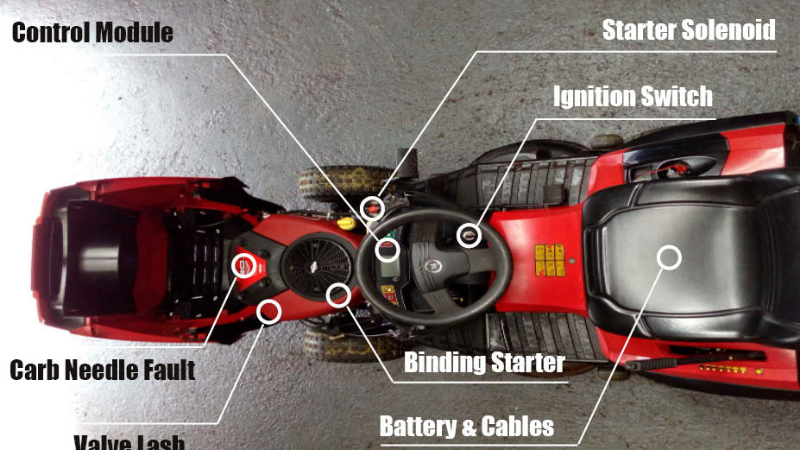
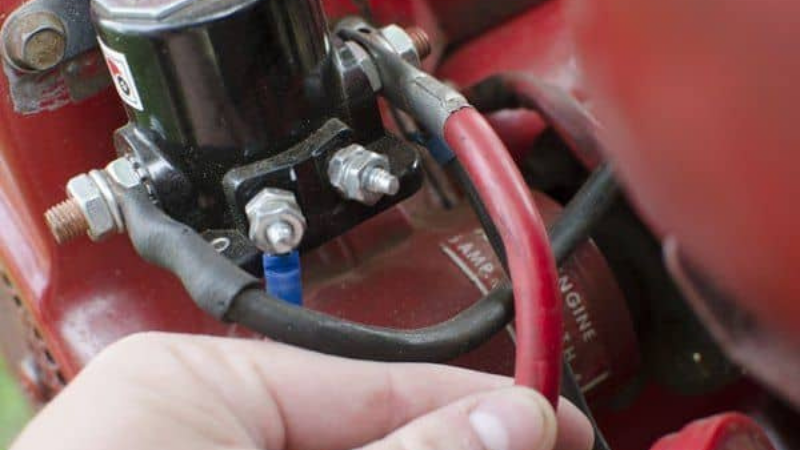
If the battery reads 12.6V or above and you're still getting a single click, the solenoid is the next suspect. The solenoid sits between the battery and the starter motor — usually mounted on the frame or firewall near the battery. It has two large terminals (battery side and starter side) and one or two small activation terminals connected to the ignition switch.
Switch your multimeter to continuity mode. Disconnect the small activation wire. Touch probes to the two large terminals. With the key off, you should read no continuity. Turn the key to start — the multimeter should show continuity momentarily. No continuity when activated means a failed solenoid. Look also for solenoid burn marks on the large terminal posts — dark carbon scoring is a definitive sign the internal contacts have failed. While you're inspecting the engine bay, also check the spark plug condition — a wet plug indicates flooding or oil infiltration that compounds your starting problems even after the electrical issue is resolved.
When to Fix It Yourself — and When to Stop
Fixes That Are Safe for DIY
The vast majority of clicking problems are fully within DIY territory if you're comfortable with basic hand tools and a multimeter:
- Charging or replacing the 12V battery
- Cleaning corroded battery terminals down to bare metal
- Replacing the starter solenoid — a bolt-on swap that typically takes 20–30 minutes
- Replacing a blown fuse in the starting circuit
- Tightening loose ground connections at the frame or battery tray
These repairs don't require draining fuel, removing the engine, or specialized equipment. If you're working on a common model like the Poulan XT675, replacement solenoids and batteries are inexpensive and available at any hardware store or online retailer.
When a Professional Should Handle It
Stop the DIY path and call a small engine mechanic when you encounter any of these conditions:
- You've replaced both the battery and solenoid, and the mower still only clicks — pointing to a failed starter motor or ignition switch wiring harness
- The starter motor engages but the engine doesn't crank, suggesting internal engine damage
- You find burned or melted wiring insulation anywhere in the starting circuit
- The flywheel ring gear is visibly chipped or cracked
At that point, you're looking at deeper disassembly that requires specific tools and expertise. The repair cost may also approach or exceed the mower's replacement value — a mechanic can give you an honest assessment before you commit.
How to Test and Replace a Faulty Starter Solenoid
Testing the Solenoid with a Bypass
The fastest way to confirm solenoid failure is the bypass test — briefly bridging the two large solenoid terminals to send current directly to the starter motor. Disconnect the spark plug wire before performing this test to prevent accidental engine startup.
- Disconnect the spark plug wire and set it well away from the plug terminal.
- Locate the solenoid — the cylindrical or rectangular component with two heavy-gauge wires attached.
- Confirm the battery reads 12.6V or higher before proceeding.
- Briefly touch a screwdriver blade or a short wire across both large terminals simultaneously.
- If the starter motor cranks the engine, the solenoid has failed and needs replacement.
- If nothing happens, the starter motor itself has failed or the battery cables are faulty at their connections.
This is also a good point to consider starting system dependencies specific to your mower model — some designs require the primer bulb to be depressed before the solenoid will activate, which can mimic solenoid failure if the bulb is cracked or stuck.
Replacing the Solenoid Step by Step
- Disconnect the negative battery terminal first, then the positive — always negative first to prevent short circuits.
- Label each wire attached to the solenoid terminals with tape and a marker before removing anything.
- Unbolt the solenoid from its mounting bracket (typically two bolts).
- Transfer the wires to the new solenoid in the same configuration: one large cable from the battery, one large cable to the starter motor, small activation wire(s) to the ignition terminal(s).
- Torque the large terminal nuts firmly — a loose connection here causes arcing that will burn through the new solenoid prematurely.
- Reconnect the battery (positive first, then negative), reattach the spark plug wire, and test.
Clicking Patterns and What Each One Means
Pattern Variations by Mower Type
The diagnostic table above covers the most common patterns, but different mower types produce subtle variations that are worth knowing before you start your diagnosis.
- Riding tractors — tend to produce a louder, more resonant single click because the solenoid and starter motor are physically larger. The sound carries through the metal chassis and can seem to come from multiple locations simultaneously.
- Zero-turn mowers — may produce clicking from safety interlock switches (seat switch, blade engagement switch) before the solenoid ever activates. If the clicking seems to originate under the seat rather than the engine bay, check interlocks first.
- Battery-powered electric mowers — clicking from these units indicates a different class of problem entirely: the battery management system is cutting current due to a low-voltage cell or thermal event. The diagnostic process differs significantly from gas mowers.
- Walk-behind gas mowers — electric-start models follow the same solenoid and battery diagnostic as riding mowers. Pull-start-only models that produce a clicking sound typically have a damaged recoil starter pawl — not an electrical issue at all.
What to Do After the Fix
Once your mower starts reliably, take two preventive steps to avoid a repeat. First, clean and coat the battery terminals with terminal protector spray at the start and end of each mowing season. Second, store the battery on a smart trickle charger through the off-season — a discharged lead-acid battery sitting in cold storage undergoes sulfation that permanently reduces cranking capacity. One season on a maintenance charger extends battery life significantly.
And once your mower is running reliably again, your lawn may need some recovery attention after the downtime — our guide on which fertilizer greens up a lawn fastest will help you get your turf back in shape quickly. Also inspect the area around the solenoid annually — grass clippings, moisture, and dust accumulate around electrical connections and accelerate corrosion faster than almost any other factor. A 60-second visual check each season catches problems before they strand you mid-mow.
Frequently Asked Questions
Why does my lawnmower click once and then nothing?
A single click with no follow-through almost always points to the starter solenoid. The solenoid is attempting to engage but lacks sufficient current or has burned internal contacts. Test the battery voltage first — if it reads 12.6V or above, perform a solenoid bypass test to confirm the solenoid is the failure point.
Can I bypass the solenoid to start my mower?
Yes, temporarily. Bridging the two large solenoid terminals with a screwdriver — with the spark plug wire disconnected — will test whether the starter motor is functional. This is a diagnostic step, not a permanent solution. Always replace the faulty solenoid before returning the mower to regular use.
Why is my lawnmower clicking but the battery is new?
A new battery doesn't rule out a connection problem. Check that both terminal clamps are tight and corrosion-free. A new battery with a loose negative cable or a corroded positive clamp delivers inadequate current the same as a dead battery would. Also verify the battery's CCA (cold cranking amps) rating matches your mower's specification — an undersized battery will click even when fully charged.
Why does my riding lawnmower click when I turn the key?
The most common causes on riding mowers are a weak battery, a faulty starter solenoid, or a triggered safety interlock. Check the seat switch and blade engagement switch first — many riding mowers won't activate the solenoid if an interlock condition isn't satisfied. If interlocks check out, move to battery voltage and solenoid testing in that order.
How do I know if my lawnmower solenoid is bad?
Three indicators point directly to solenoid failure: a single click with no crank, the solenoid body is hot to the touch shortly after an attempted start, or there's visible carbon scoring on the large terminal posts. Confirm with a continuity test — a failed solenoid won't pass current between its two large terminals when the activation signal is applied.
Why is my lawnmower clicking after sitting in storage?
Storage discharges and degrades batteries. A 12V lead-acid battery left discharged over winter undergoes sulfation — the lead plates develop crystals that permanently reduce capacity. The battery may read 12V on a multimeter but fail to deliver the cranking amps needed to spin the starter motor. Charge it fully, then load-test it. If it fails the load test, replace it — no amount of charging will recover a sulfated battery.
Can corroded battery terminals cause a clicking sound?
Absolutely. Corrosion adds resistance directly into the starting circuit. Even with a fully charged battery, heavy corrosion on the terminals prevents the solenoid from receiving adequate current. Clean both terminals to bare metal with a wire brush, reconnect them firmly, and retest before replacing any parts — this simple step resolves clicking more often than most people expect.
Is it safe to keep trying to start a clicking lawnmower?
Limit yourself to three or four attempts. Repeated cranking attempts when the battery is already low deplete it faster and generate heat in the solenoid from repeated partial engagements. Continuous attempts also stress the starter motor unnecessarily. Diagnose the root cause before trying again — more attempts don't fix the underlying electrical failure.
Key Takeaways
- Lawnmower clicking is always an electrical issue — a single click points to the starter solenoid, rapid clicking points to a weak battery, and silence points to the ignition switch or a blown fuse.
- Test battery voltage with a multimeter first — it's the cheapest and fastest check, and it resolves the problem most often, especially after storage or in cold weather.
- A solenoid bypass test confirms solenoid failure in under two minutes, and the replacement is a straightforward bolt-on swap that costs under $40 and takes less than half an hour.
- Prevent future clicking by keeping terminals clean, storing the battery on a trickle charger during the off-season, and doing a quick electrical inspection at the start of each mowing season.


About Lee Safin
Lee Safin was born near Sacramento, California on a prune growing farm. His parents were immigrants from Russia who had fled the Bolshevik Revolution. They were determined to give their children a better life than they had known. Education was the key for Lee and his siblings, so they could make their own way in the world. Lee attended five universities, where he studied plant sciences and soil technologies. He also has many years of experience in the U.S. Department of Agriculture as a commercial fertilizer formulator.
Get FREE Gardening Gifts now. Or latest free toolsets from our best collections.
Disable Ad block to get all the secrets. Once done, hit any button below