How To Make A Carbon Air Filter For Your Grow Tent? Step By Step Guide
by Lee Safin
There are many reasons why a person can choose to grow a plant indoors or grow a tent. Growing a plant indoors will give you more control over your water, light, air, humidity, and temperature.
So, the question is, how to make a carbon air filter for your grow tent?
To make a carbon air filter for your grow tent at first, you need to prepare the pre-filter. After that make an activated carbon bed and assemble the body including the air passage. Simple 3 steps are required to make a carbon air filter for your grow tent.
With so much control over your grow space, you will be able to boost your plants’ health and achieve the best result possible.
Contents
- How To Make A Carbon Air Filter For Your Grow Tent? Step By Step Guide
- Additional Tools You May Required
- How to Assemble The Carbon Air Filter?
- Why You Need A DIY Carbon Filter for Grow Tent?
- What Is A Ventilation System?
- What Is A Filtering Medium?
- What Are The Different Types of Air Filtering Medium Available?
- How Does An Activated Carbon Air Filter Work?
- How To Make An Activated Carbon Air Filter?
- Where To Put a Carbon Air Filter?
- Wrapping up
How To Make A Carbon Air Filter For Your Grow Tent? Step By Step Guide

However, with control over so many elements in your grow space, you will also be responsible for these elements and need to adjust them accordingly to get the best results possible.
If you fail to achieve the optimal atmosphere for your plants to grow, they might even wither and die.
For most people, it’s difficult making a DIY carbon air filter rather than buying it. So in this article, we discussed from the bottom to guide you “How To Make A Carbon Air Filter For Your Grow Tent?”
Step 1 – Prepare The pre-filter
This may sound awkward, but the most ideal and suitable material for your pre-fibration process is pantyhose.
This cloth consists of fine pores, which help remove the large pollutants and debris from the air. A pantyhose is also very stretchable, which makes it ideal for covering a larger air filter quickly.
Alternatively, you can also use a high knee sock if you are looking to build a smaller air filter.
Step 2 – Make The Activated Carbon Bed
The pre-filter shouldn’t just end with pantyhose or socks. You will need a more sturdy pre-filter to help protect your activated carbon bed and make it last longer.
It would be wise to get the pre-filter from Amazon. The prices of a sheet of pre-filter can range from $10 to $20.


I would suggest the AF carbon air filter sheet.
Since your plants are concerned here, it is best not to compromise the filtering medium. It is highly recommended to make some investment here rather than making your activated carbon.
You can purchase the activated carbon directly from Amazon.


I would suggest the Laboratory Grade Premium Activated Carbon by Marineland.
It’s 40 ounces of activated carbon for approximately $14. Remember, this product will come in an air-tight jar, and the amount is enough to build two large air filters.
Step 3 – Assemble The Body And The Air Passage


For the scaffolding or the body, you will need two jars, and their sizes should be at a ratio of 3/4 or 4/5. Instead of the jars, you can also take mesh wastebaskets or meshed pencil stands if you are looking to start small.
Additional Tools You May Required


Whenever you sit down for some craftwork, it is best to have some essential tools at hand. You may never know when what may come in handy.
Before you begin to assemble your carbon air filter, you should keep aside a pair of scissors, duct tape, sturdy strings, glue (make sure it is PVC glue), and a drill machine just in case and a hacksaw.
How to Assemble The Carbon Air Filter?
Step 1 – Prepare The Jars
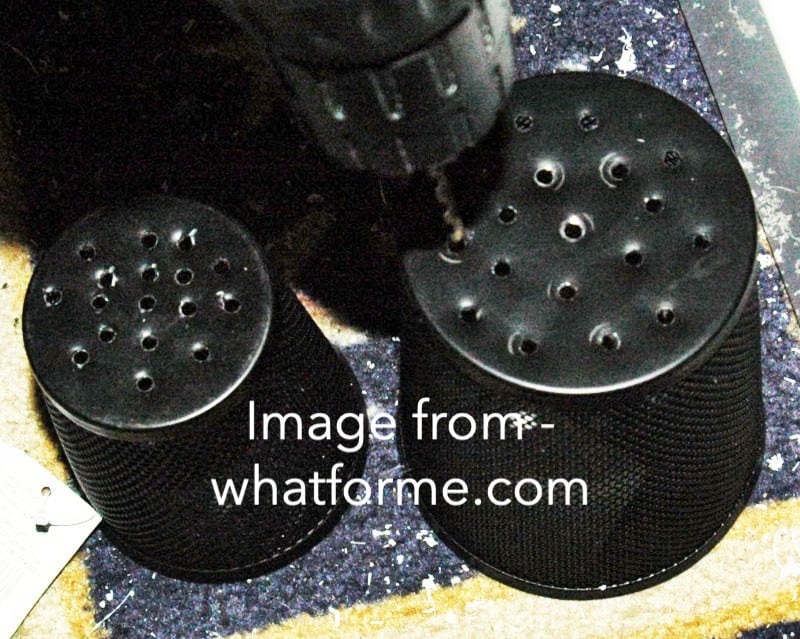
We will be constructing our carbon air filter using the most basic recyclable household item, two plastic jars. Ensure that the two jars are of the same shape; however, their size should be ratio 2/3 or 3/4.
Now start drilling holes evenly all around. Try to drill the holes as small as possible. You can aim for a 5 32 drill bit size but be careful while drilling the holes.
You do not want to damage the plastic jars as they are of delicate material.
In the end, this is how both your jars should look after drilling the holes.
Note
You can skip this step entirely if you plan on using a mesh dustbin or a meshed pencil stand. Just keep in mind that this will form your carbon air filter’s outer and inner body, hence the size ratio.
The carbon air filter will be as large as the bigger jar, and the diameter of the smaller jar will be the size of the air passageway.
You will also reuse these two jars again just by changing the carbon bed when it is saturated.
Step 2 – Assemble The Jars
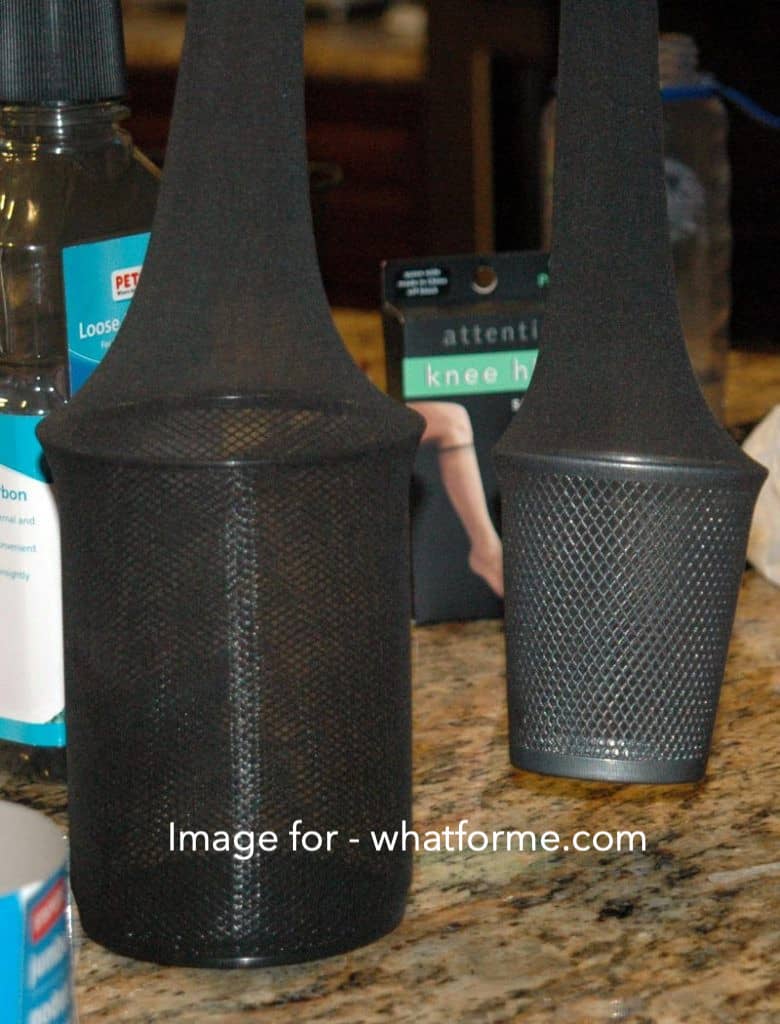
Now cut the pantyhose and secure it firmly all around the smaller jar. You can do this by cutting a leg piece from the pantyhose, tie one end of it into a knot and pull it over the smaller jar.
Secure it firmly with a string. Make sure that any air passing into the jar goes through the pantyhose cloth. Remember to keep the mouth of the jar open as this is the place through which fresh air will be released.
You can also use socks instead of pantyhose to cover the inner jar.
Do not cut the excess cloth of the pantyhose or socks if you decide to use one, which tends to cover the small jar’s top surface.
Leave it as it is, and later you can decide to cut it or use it to connect with the ducting. This clothing piece will help handle the inner jar better in step 4 when we are settling the activated carbon bed.
Step 3 – Put The Small Jar Inside The Large Jar
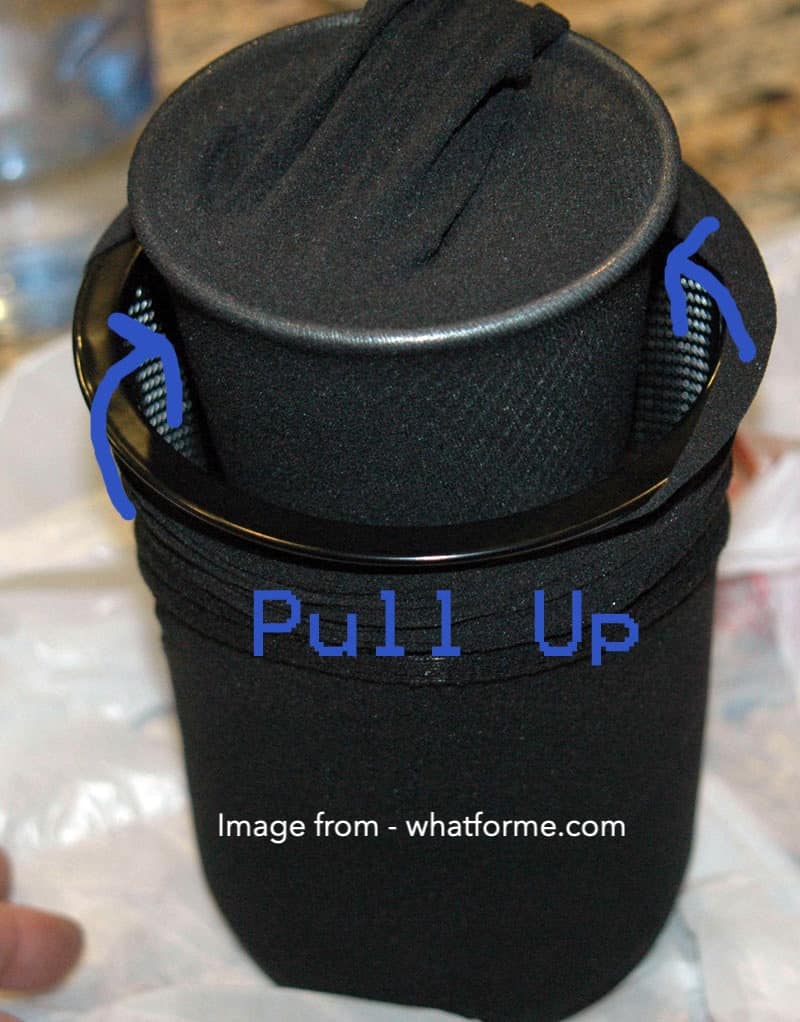
This step can be a bit tricky, but with some careful handwork, everything should be fine. The objective of this part is to put the small jar inside the large jar.
However, the top opening of the jars can be a bottleneck. This might prevent you from placing the smaller jar inside through space on the top.
So you have to cut the larger jar so that you can open it in two, fit the smaller jar inside and then glue it back together.
To do this, use the hacksaw, a paper cutter, or a knife, whatever suits you, and make a circular cut all around the jar. You can make this cut in the center or the bottom.
For me, I would choose the center and saw the jar all around so that I can neatly separate the large jar into the top part and the bottom part.
Now place the smaller jar on the base or the lower half of the larger jar and cover it with the top half of the other piece of that jar.
Now apply the PVC glue to the junction of the two jars and secure firmly.
Remember by now, the smaller jar should be covered with socks or pantyhose, and both the jars should be facing the same direction.
That means the mouth of the smaller jar and the larger jar should be on the same side. Make sure you pull the top part of the pantyhose or the socks that tend to cover your smaller jar’s mouth through the mouth of the larger jar.
You should be able to move the smaller jar within the larger jar’s confinements with the help of this extra piece of cloth sticking out.
Note
You can also cut the excess piece of cloth from the pantyhose or socks that threaten to cover the mouth of the smaller jar.
Just use the cloth to cover the small jar perfectly, and while placing it inside the larger jar, you could apply this method.
Place the top half of the large jar upside down. Now apply glue to the mouth of the small jar.
If you are confused about where to add the glue, use the image below. Now turn the small jar upside down and place it firmly on the top half of the large jar.
Wait for the glue to dry, and be sure that the small jar is secured firmly to the top portion of the large jar.
Step 4 – Attach Pre-filtering Medium
Now that you have the whole scaffolding ready for your carbon air filter, it is time to attach the necessary pre-filtering medium.
Take the activated carbon pre-filter sheet, cut it in the appropriate size to wrap it around the larger jar. You can stick it by applying glue in certain strategic places.
Make sure it is tight, with no air space between the carbon filter sheet and the jar’s surface.
You can also cover this entire large jar with the other pantyhose piece after wrapping it with the pre-filter sheet for added efficiency.
Step 5 – Add The Activated Carbon Bed
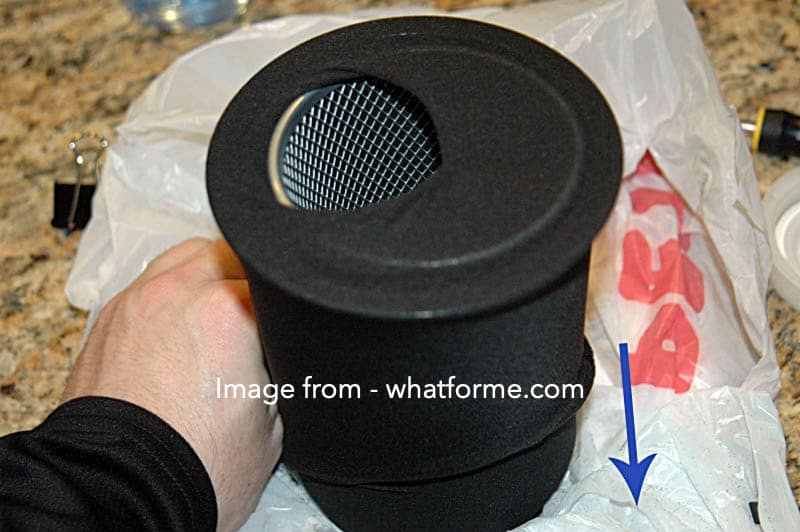
This is the step where you are going to add the activated carbon bed.
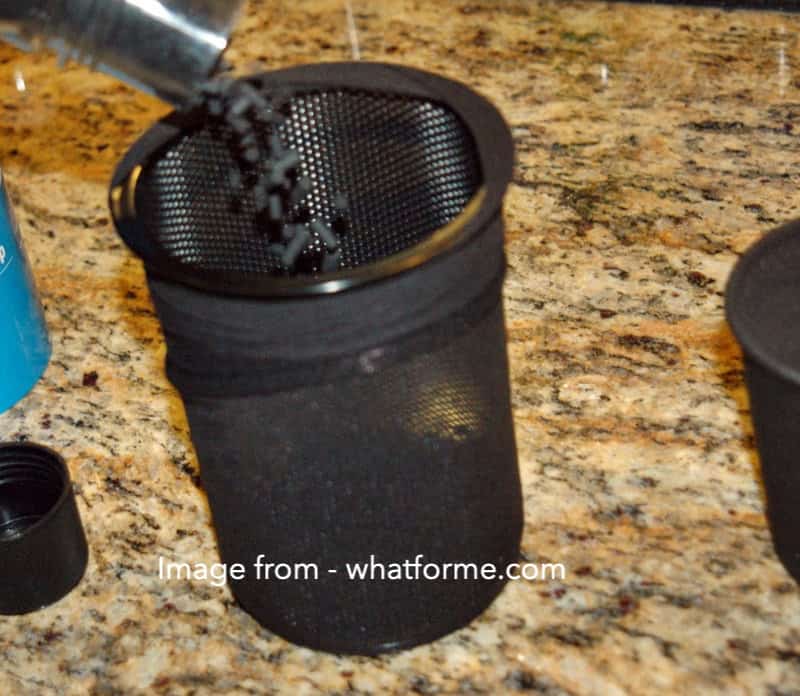
This step aims to pour the activated carbon into the larger jar so that the activated carbon bed is in between the larger jar and the smaller jar, which is covered by the pantyhose.
We should take the jars in the ratio of 2/3 or 2/4 so that there is space between the jars for the activated carbon.
Now, most of us will be using different jars, and the two jars may not be accurate in the ratio suggested. Even their shapes may be different.
The smaller jar’s mouth can be tightly fitted with the larger jar, or you may have used the glue to secure the small jar firmly to the large jar, and this will not leave you any space to pour in your activated carbon.
Those who have space between the two jars’ mouths can pour the activated carbon through the gap.
However, for those who do not have this space, you can drill a few holes on the jar, which is large enough to pour the activated carbon.
I would advise taking the whole setup and turn it upside down. Now drill the holes in the bottom of the jars. Two sufficiently large holes should be enough.
I asked to drill two holes because, with only one hole, the air pressure will act against it when pouring the activated carbon.
With two holes, the jar’s air pressure will be neutralized, and it will be easier to pour the activated carbon.
Take a funnel and use it to start pouring the activated carbon through the hole. Be generous with the activated carbon and fill up all space between the two jars.
There should be no air space left. After you have poured the activated carbon, use an aluminum foil from your ducting.


Squeeze it in a proper shape so that it fits perfectly in the holes that you have drilled at the bottom of your carbon air filter.
Finally, take some duct tape and cover these two holes so that there is no air leak.
Those of us that have an opening at the top between the mouths of the two jars or the cloth sticking roll a thick layer of aluminum foil (the material used for ducting) and apply it in the crack or the space between the jar mouths and seal it properly with duct tape.
Step 6 – Add It At the Opening An Exhaust Fan
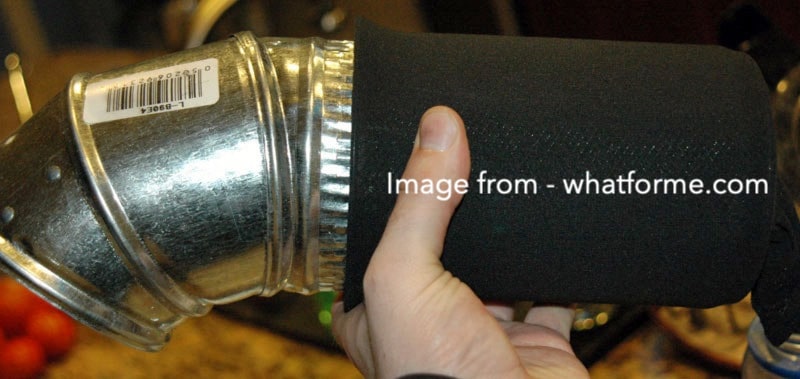
This whole thing that you have constructed is an activated carbon air filter. Space which is the inside of the smaller jar, is your passageway for air. You are supposed to add an exhaust fan here to pull the air from this passage.
If you are willing to get the best exhaust fan for your grow tent, then check our linked article.
The whole setup should work in this manner. When the exhaust fan runs, it draws in air from the air passage. This will cause the air from the atmosphere to be drawn in towards the filter.
It will enter through the carbon air filter sheet (applied in step 4), covering the large jar’s surface. This will filter the air from large pollutants or pollen.
The air will then enter the large jar through the holes you drilled (in step 1) on its surface.
This air will then pass through the activated carbon bed. This activated carbon will filter the air before passing it through the air holes in the small jar.
The pantyhose or the socks will apply the final filtration as it removes the activated carbon particles that tend to stay and let the air into the air passage.
This fresh air will finally be drawn in by the exhaust fan and released.
Note
You can take a smaller jar to increase the difference between the sizes of the large jar. This will leave more space to fit more activated carbon.
This will increase your carbon air filter; however, this will also reduce the capacity of your filter as the air passage will be much smaller.
The finer the grains of the activated carbon are, the more efficient the air filter will be. You can further grind the activated carbon that you purchased to increase this efficiency.
Finally, do not forget to check if the air filter is working. To do this, you can light up a cigarette and, with the exhaust fan running, take the cigarette near the air filter.
The air filter should pull in the cigarette smoke and then smell the fresh air that comes out.
There might still be a bit of smell, but overall, the fresh air should not stink. This will help you determine the efficiency of your air filter.
So I would suggest you click on the link of “the best exhaust fan for grow tent” and get the best one from the bests.
However, if you are willing to know how to hang an exhaust fan on your grow tent, then click on the link to check our latest article on it.
Why You Need A DIY Carbon Filter for Grow Tent?
As I said, if you fail to achieve the optimal atmosphere for your plants to grow, they might even wither and die.
The various areas that need to be monitored in a grow tent can be broken down into 4 parts. A grow tent is a solid structure that seals your plants in an enclosed air-tight environment.
This will help you to adjust and monitor all the environmental elements that your plants require.
In the next step, you step up the lights for your plants required for your plants’ photosynthesis.
You need to adjust the ventilation system in your grow tent so that your plants get the necessary carbon dioxide and humidity required for their respiration purpose.
We have already covered how you can set up a grow tent and lights and a ventilation system.
In this article, we will take down the ventilation system and discuss it in further detail.
The ventilation system consists of three major parts:
- An exhaust fan
- A carbon air filter
- Ducting
Together they form one ventilation system and for large grow tents, you will need several ventilation systems.
To be more precise, we will cover how a carbon air filter works, and by the end of this article, you should be able to construct your carbon air filter.
What Is A Ventilation System?
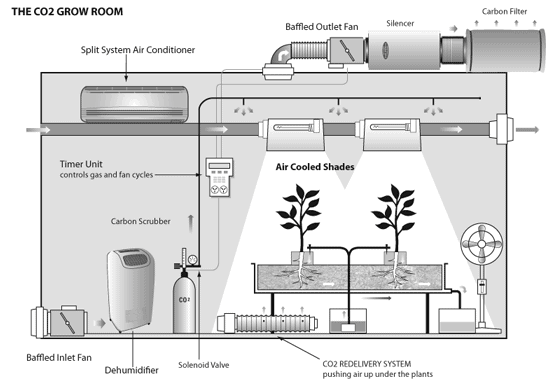
Before jumping into the section of “How To Make A Carbon Air Filter For Your Grow Tent?” we should learn a bit about the ventilation system.
A lot of us are very familiar with air purifiers.
However, many of us, especially those still new in the gardening world, may be unfamiliar with its application in a grow tent or a greenhouse.
So in a grow tent or a greenhouse, you need to attach a ventilation system for your plants to get the necessary amount of air to respire.
Unlike humans, plants take in carbon dioxide and give out oxygen.
Your ventilation system should have the capability to extract this oxygen from your grow space and fill it with fresh air from the atmosphere so that there enough carbon dioxide for your plants.
A carbon air filter uses a bed of activated carbon. Air passes through this bed of activated carbon, and the impurities present in the air, such as pollutants, germs, pathogens, get stuck in the activated carbon bed.
Now in the ventilation of your grow space, you often need to attach a carbon air filter. It is unnecessary to secure a carbon air filter and an extractor fan if your grow scale is microscopic, like a single plant.
However, you need to attach an air filter to the ventilation system for sufficiently large grow spaces.
Attaching a carbon air filter will protect your plants from the pollutants present in the air to external germs getting in your grow space.
With some smart placing of air filters, you can even mask the smell of individual exotic plants that can attract neighbors’ attention and bring unwanted questions.
What Is A Filtering Medium?
Air can be filtered in several ways. One of the most natural and clean methods is to use a filtering medium.
A filtering medium is a material or a substance with physical properties capable of removing unwanted particles from the air.


This can range from anything to paper, cotton, and even foam. An activated carbon air filter falls under a medium filtering category.
I will also discuss some other forms of filtering methods briefly. This will further help you to tweak the filtering method in your grow tent.
What Are The Different Types of Air Filtering Medium Available?
There is a variety of air filtering mediums available in the market. So, I thought, I will show you the efficient ones only.
UV Filters


As the name suggests, UV filters use ultraviolet rays of light to destroy microorganisms present in the air. You can say this is an excellent disinfectant for the air as well as your plants.
Do not confuse UV lights with LED lights. UV lights are harmful to any form of living cells, be it human or plants, in prolonged exposure.
However, small doses of UV lights will help kill microorganisms and pathogens present deep in your plants’ stems.
Ultraviolet lights for grow tents are usually handheld, and you can point with it at a specific area to destroy the microorganisms in that area.
If you want to purchase a UV air filtering medium them I would suggest the MELEDEN Air Purifier.
Electrostatic filter


In this type of filtering process, electric charges neutralize the air’s pollutants and other substances.
This type of air filter is not very suitable in a grow tent.
However, if you are willing to buy one for your home (as they are very efficient for your house), you can get the best of the bests. Mila Smart Air Purifier is the best one available in the market. I am using it because there is not another one as it served me.
How Does An Activated Carbon Air Filter Work?
Before we discuss how to make a carbon air filter for your grow tent, you should know how it functions. Carbon itself is an excellent neutralizing agent that stabilizes various impurities and pollutants.
However, when carbon is treated with oxygen, it becomes activated carbon.
This activated carbon expands to occupy a larger surface area and becomes more pours. This highly porous nature is what makes carbon air filter the most suitable material for the filtration process.
Usually, carbon air filters these days come equipped with an exhaust fan or attach one externally. This exhaust fan will pull the air through the carbon air filter.
This air travels through the pre-filter. This is the first layer of a carbon air filter, and it removes large particles like dust or dirt from the air.
Only after the air is pre-filtered, it reaches the bed of activated carbon. This activated carbon bed then removes the air’s microscopic elements such as pathogens, moisture, pollutants, and even those produced by your plants, such as smell and pollen.
The air gets processed adequately as it passes through the activated carbon bed to the air passageway and gets releases back into the atmosphere.
Therefore the essential parts of a commercial activated carbon air filter can be broken down into:
- The pre-filter
- The body
- Activated Carbon Bed
- The passage for air
How To Make An Activated Carbon Air Filter?
The minimum price of a commercial air filter is $50 on amazon.


However, you can craft yourself two air filters for the same amount of money that you can keep using for several harvests just by changing the activated carbon bed and the pre-filters.
This is just a fraction of a price compared to changing an entire carbon air filter for a grow tent, and crafting this will only be difficult the first time around.
For those who enjoy craftwork and don’t mind getting their hands dirty, this will be fun.
Now taking the components of a commercial activated carbon air filter (the one you purchase in a store). You will need to construct the pre-filter, the body, activated carbon bed, and a passageway for air.
Where To Put a Carbon Air Filter?
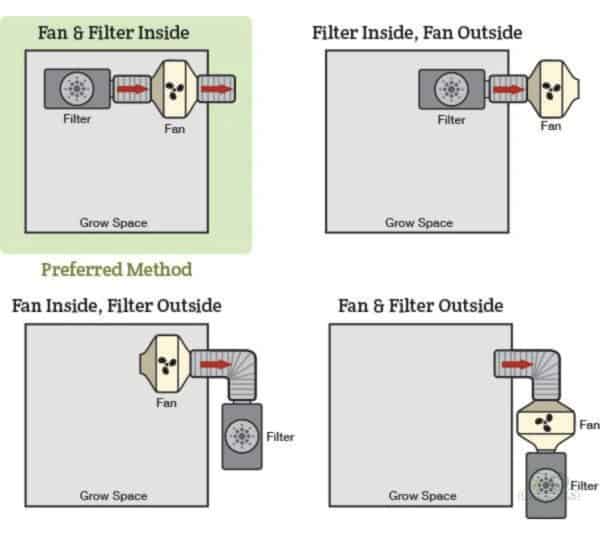
If you say me to evaluate, then I will say knowing where to put the carbon air filter is much more important than knowing how to make a carbon air filter for your grow tent.
The location of your carbon air filter will depend on what purpose the ventilation channel is used for. A small grow tent will require only one carbon air filter and a ventilation channel.
However, large grow tents with more plants will require more ventilation channels with the carbon air filter.
There are two types of ventilation channels. One is for the fresh air to come in the grow tent, and the other is to expel the used air, which mostly constitutes oxygen from the grow tent.
The ventilation channel for the airflow into the grow tent should be placed at the bottom of the tent, whereas the carbon air filter which filters the air inside your grow tent should be placed on top or hung from the top of grow tent. This is because of how air rises.
So as the fresh air comes in from the bottom of the tent, the plants will utilize it, and the used air will rise, which will then be filtered by the activated carbon filter.
Wrapping up
I hope you understood “How To Make A Carbon Air Filter For Your Grow Tent?” Also, I can say, “How To Make A DIY Carbon Air Filter For Your Grow Tent?”
You should know the uses of an activated carbon air filter in a grow tent before attempting to build a carbon air filter.
Also, it would be best if you were handy with the instruments, especially with a drill. Often, while drilling the holes at the jars’ sides, the whole surface can crack or break, so be careful to avoid.
This article will also give you firm knowledge of how an activated carbon air filter works and the different air filtering mediums used.
Finally, you should be able to build your carbon air filter with used household materials and a few purchases from amazon.
Last update on 2023-01-28 / Affiliate links / Images from Amazon Product Advertising API
Buy on Walmart, eBay, or Etsy
Mila Smart Air Purifier - Etsy, eBay
 |
 |
 |
 |

About Lee Safin
Lee Safin was born near Sacramento, California on a prune growing farm. His parents were immigrants from Russia who had fled the Bolshevik Revolution. They were determined to give their children a better life than they had known. Education was the key for Lee and his siblings, so they could make their own way in the world. Lee attended five universities, where he studied plant sciences and soil technologies. He also has many years of experience in the U.S. Department of Agriculture as a commercial fertilizer formulator.
Thoughts on "How To Make A Carbon Air Filter For Your Grow Tent? Step By Step Guide"
 |
 |
 |
 |
Get FREE Gardening Gifts now. Or latest free toolsets from our best collections.
Disable Ad block to get all the secrets. Once done, hit any button below
 |
 |
 |
 |