Have you ever walked out to your garage, caught a sharp whiff of gasoline, and traced it straight back to your mower? A lawn mower carburetor leaking fuel is one of the most common mechanical problems a homeowner faces — and in almost every case, the culprit is a worn needle valve, a dirty float seat, or a cracked gasket that costs less than ten dollars to fix. For more lawn maintenance guidance, browse our gardening tips section.

The carburetor blends air and fuel in the right ratio before it enters the combustion chamber. When a component inside fails, raw gasoline seeps past the bowl gasket, drips from the overflow tube, or puddles under the machine after shut-off. That dripping fuel is a fire hazard and a sign your engine is about to run poorly — or refuse to start at all. If your mower already has a wet spark plug, a leaking carburetor is very likely the reason.
This guide covers every common cause of carburetor fuel leaks, the tools you need, the exact repair steps, and the mistakes that turn a simple fix into an expensive headache. By the time you finish reading, you'll know precisely what's wrong and how to correct it.
Contents
- How to Spot a Lawn Mower Carburetor Leak in Minutes
- The Most Common Causes of a Lawn Mower Carburetor Leaking Fuel
- Tools and Replacement Parts You'll Need
- How to Clean and Repair a Leaking Carburetor
- Carburetor Leak Myths That Keep Mowers in the Shop Longer
- Mistakes That Turn a Simple Carburetor Fix Into a Bigger Problem
- Frequently Asked Questions
How to Spot a Lawn Mower Carburetor Leak in Minutes
Where Leaks Typically Appear
Before you disassemble anything, do a quick visual inspection with the fuel shut-off valve closed. The most common leak points are the bowl gasket at the base of the carburetor bowl, the overflow tube (a small brass or rubber tube that exits the side of the carb), and the primer bulb housing if your mower has one. Gasoline leaves a wet, shiny trail or a dried residue that smells unmistakably of fuel. Note the exact location before wiping anything clean.
Confirming the Source Before You Start
Wipe the carburetor and surrounding area completely dry with a shop rag. Open the fuel valve just slightly and watch for 30 seconds. The spot where a drop first appears is your leak point. This simple test prevents you from replacing parts that are perfectly fine. Mark the location with a strip of tape so you don't lose track of it once you start removing components.
The Most Common Causes of a Lawn Mower Carburetor Leaking Fuel
Faulty Float Needle Valve
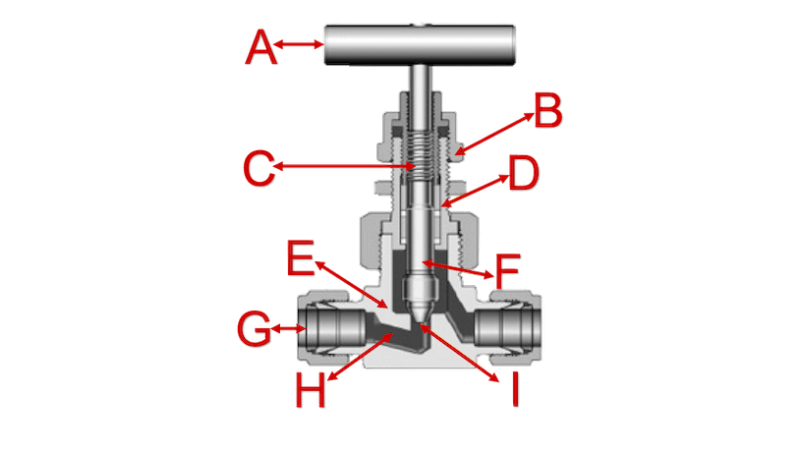
The float needle valve is the gatekeeper of your carburetor's fuel supply. When the float rises to the correct level, the needle presses against its seat and shuts off incoming fuel. When the needle wears down, gets stuck open, or loses its rubber tip, it can no longer form a tight seal. Fuel keeps flowing into the bowl even after it's full, overflowing through the vent tube or seeping past the gasket. A worn or stuck needle valve is the single most common cause of carburetor overflow leaks — and it costs five to twelve dollars to fix.
Debris Under the Float Needle

Even a tiny piece of grit or varnish residue sitting between the needle and its seat prevents a complete seal. Old fuel breaks down into a sticky varnish over time — especially if the mower sat through a season with gasoline left in the tank. That residue coats the needle seat and holds the valve slightly open. This is why understanding what fuel your lawn mower actually needs matters: stale or high-ethanol gas accelerates varnish buildup inside the carburetor far faster than fresh, stabilized fuel.
Deteriorated Gaskets and O-Rings
The bowl gasket is a rubber or cork ring that seals the junction between the carburetor body and the fuel bowl. Heat cycles, ethanol exposure, and simple age cause it to harden, shrink, or crack. Once it loses flexibility, fuel finds a path out. The same failure happens to O-rings on the bowl drain screw or emulsion tube. These are inexpensive parts — usually under three dollars — and replacing them is one of the fastest repairs you'll make on any small engine.
Cracked or Waterlogged Float
The float is a hollow plastic or brass component that rises and falls with the fuel level inside the bowl. If it develops a crack or pinhole, fuel seeps inside and makes it heavier than designed. A heavy float rides lower, which means the needle valve never rises high enough to cut off the fuel supply. Test a plastic float by removing it and shaking it next to your ear. A sloshing sound means it's compromised. Replace it — there's no reliable way to patch a cracked float.
Tools and Replacement Parts You'll Need
Essential Tools for the Job
You don't need a full mechanic's toolbox to fix a leaking carburetor. Most repairs require only a handful of items you may already own. Having everything laid out before you start prevents the frustrating mid-repair search for a missing screwdriver.
| Tool / Part | Purpose | Approximate Cost |
|---|---|---|
| Flathead screwdriver | Remove bowl drain screw and bowl nut | Already owned |
| Carburetor cleaner spray | Dissolve varnish and debris | $6–$10 |
| Needle-nose pliers | Remove and reseat the needle valve | Already owned |
| Replacement bowl gasket | Seal the carburetor bowl | $2–$5 |
| Needle valve kit | Replace worn needle and seat together | $5–$12 |
| Carburetor rebuild kit | All gaskets, O-rings, and needle in one | $8–$18 |
| Small container | Drain and collect fuel from the bowl | Already owned |
| Shop rags | Catch draining fuel and wipe surfaces clean | Already owned |
Sourcing the Right Parts
Always look up your mower's model number — stamped on the engine block — before ordering anything. A carburetor rebuild kit includes every small component you're likely to need: gasket, O-rings, needle valve, and float pin. Ordering the full kit rather than individual pieces ensures you have everything without a second run to the hardware store. According to the U.S. Environmental Protection Agency, fuel volatility and ethanol content directly affect small engine rubber components — using the grade specified in your owner's manual reduces premature gasket failure significantly.
How to Clean and Repair a Leaking Carburetor
Cleaning the Float Needle and Seat
Close the fuel shut-off valve completely, place a container under the carburetor, and remove the bowl drain screw to let residual fuel drain out. Unbolt the bowl nut at the bottom of the carb and carefully pull the bowl free. Inspect the old gasket — if it's flat, cracked, or stiff, discard it immediately. Lift the float pin out with needle-nose pliers and remove the float and needle together. Spray the needle seat generously with carburetor cleaner and wipe away any varnish or debris with a clean cloth. If the needle's rubber tip is grooved or hardened, replace the entire needle valve assembly — don't attempt to sand it smooth.
Pro tip: Soak the entire carburetor bowl in fresh carburetor cleaner for 15 minutes before scrubbing — it dissolves stubborn varnish deposits that a quick spray alone won't reach.
Replacing the Bowl Gasket
Seat the new gasket on the carburetor body. It should sit flat without forcing or folding at the edges. Reinstall the float and needle, confirming the pin slides cleanly back into its pivot posts without binding. Drop the bowl back on and hand-tighten the bowl nut, then give it an additional quarter-turn with your screwdriver. Stop there. Over-tightening is one of the most destructive mistakes in this repair and will crack a plastic bowl or distort the new gasket immediately, undoing all your work.
Reassembly and Testing
Once everything is back together, open the fuel valve and wait 60 seconds before attempting to start the engine. Watch the carburetor closely during that minute. No drips means the leak is solved. If fuel still seeps from the overflow tube, the needle valve isn't seating correctly — pull the bowl again and check the float pin alignment. If your mower still struggles to start after the repair, review how to start a lawn mower without a primer bulb, since air pockets in the fuel line can mimic carburetor-related starting problems.
Carburetor Leak Myths That Keep Mowers in the Shop Longer
Myth: You Always Need to Replace the Entire Carburetor
This is the most expensive misconception in small engine repair. A replacement carburetor for a common walk-behind mower costs $30 to $80 and takes 45 minutes to install. But in most cases, the actual failed component is a two-dollar gasket or a five-dollar needle valve. Full carburetor replacement is only justified when the body is cracked, the throttle bore is damaged, or the threads are stripped past recovery. If a shop recommends a full replacement without diagnosing the specific leak point, ask them to identify the exact failure before you agree to anything.
Myth: Old Gas Is Fine if the Engine Still Runs
Gasoline degrades in as little as 30 days without a stabilizer. The light volatile compounds evaporate first, leaving behind a heavier residue that turns into varnish inside your carburetor. That varnish is exactly what jams float needles and coats needle seats. If you detect a sour or lacquer-like smell coming from the tank, the fuel has already broken down. Drain it completely, flush the tank, and refill with fresh fuel before assuming your carburetor repair will hold long-term.
Myth: Tightening the Bowl Nut Harder Will Stop the Leak
It won't. If fuel is dripping from the bowl joint, the gasket is the problem — not the torque on the bolt. Cranking the bowl nut past hand-tight plus a quarter turn will crack plastic bowls and strip threads on metal ones, turning a two-dollar fix into a carburetor replacement. The gasket does the sealing work. The bowl nut simply holds the bowl in position while the gasket does its job.
Mistakes That Turn a Simple Carburetor Fix Into a Bigger Problem
Skipping the Root Cause Diagnosis
Replacing the bowl gasket without inspecting the needle valve is the most common repeat-repair mistake there is. You'll be back under the mower in a week with the same drip. Every leak has a primary cause. Take the extra five minutes to examine every component inside the bowl before you reassemble anything. It costs nothing in parts and eliminates the frustration of a problem that returns immediately.
Using the Wrong Fuel After the Repair
Ethanol blends above E10 degrade small engine rubber components faster than the manufacturer designed for. If you've been running E15 or higher — fuels intended for modern automobiles — you're accelerating gasket and O-ring deterioration with every fill-up. Check your owner's manual for the recommended fuel specification and stick to it. Fresh, ethanol-appropriate fuel is the single cheapest form of carburetor maintenance available to you.
Ignoring End-of-Season Storage Prep
Most carburetor leaks that appear in spring trace directly to improper fall storage. Leaving fuel in the carburetor through winter lets it evaporate into varnish, jam the needle valve, and clog the jets. Always add a quality fuel stabilizer or run the carburetor completely dry before storing the mower for more than 30 days. This one habit eliminates the most common cause of next-season leaks before they start — and it takes less than ten minutes to do properly.
Frequently Asked Questions
Why is my lawn mower carburetor leaking fuel from the overflow tube?
The overflow tube drains excess fuel when the float bowl fills past its designed level. This almost always points to a stuck or worn float needle valve that can no longer shut off incoming fuel. Clean or replace the needle valve and inspect the float for damage — those two fixes resolve the vast majority of overflow tube leaks.
Can I run my mower with a carburetor fuel leak?
No. A leaking carburetor is a fire hazard, full stop. Dripping gasoline near a hot engine or an electrical spark creates a genuine risk of ignition. Shut the fuel valve off and park the mower until the leak is repaired. The repair is almost always inexpensive and straightforward — there's no reason to run it in this condition.
How long does it take to fix a leaking carburetor?
Most carburetor leak repairs take between 20 and 45 minutes once you have the correct parts in hand. Cleaning the needle seat and swapping a bowl gasket is the common scenario and sits at the shorter end of that range. If you need to replace the needle valve assembly or the float, budget the full 45 minutes to do it carefully.
What causes a carburetor to leak fuel when the engine is off?
Leaking when the engine is off almost always means the needle valve is failing to seal. With the engine running, fuel is consumed as fast as it enters. When the engine stops, incoming fuel has nowhere to go and overflows. A stuck needle from debris or a worn rubber tip on the needle are the two primary culprits.
Is it safe to use carburetor cleaner spray on rubber parts?
Standard aerosol carburetor cleaner is too aggressive for rubber components — it will swell and deteriorate O-rings and gaskets on contact. Remove all rubber parts before soaking or spraying metal components. Use the cleaner only on the metal body, jets, and needle seat, then rinse with fresh gasoline before reassembly.
How do I know if my carburetor float is bad?
Remove the float from the bowl and shake it next to your ear. A sloshing or gurgling sound confirms that fuel has entered through a crack or pinhole, making it too heavy to rise properly. You can also submerge a brass float in boiling water — bubbles escaping indicate a leak. Either way, replace a compromised float rather than attempting to patch it.
Do I need to remove the carburetor from the engine to fix a leak?
Not always. Many leaks — particularly bowl gasket failures and needle valve issues — can be fixed with the carburetor still mounted on the engine. You simply remove the bowl from the bottom. Full removal is only necessary when you need to access internal passages, replace the throttle shaft seals, or send the carburetor out for ultrasonic cleaning.
How often should I clean my lawn mower carburetor?
Clean the carburetor at least once a season, ideally at the start of spring before the first use. If you use fuel stabilizer and drain the carburetor before winter storage, annual cleaning is sufficient for most mowers. If you notice hard starting, rough idling, or surging between cleanings, those are signs the carburetor needs attention sooner.
A leaking carburetor is almost never a reason to replace your mower — it's a reason to spend twenty minutes and ten dollars getting it right.


About Lee Safin
Lee Safin was born near Sacramento, California on a prune growing farm. His parents were immigrants from Russia who had fled the Bolshevik Revolution. They were determined to give their children a better life than they had known. Education was the key for Lee and his siblings, so they could make their own way in the world. Lee attended five universities, where he studied plant sciences and soil technologies. He also has many years of experience in the U.S. Department of Agriculture as a commercial fertilizer formulator.
Get FREE Gardening Gifts now. Or latest free toolsets from our best collections.
Disable Ad block to get all the secrets. Once done, hit any button below