How Should You Set up Your Grow Tent? Step By Step Guide
by Lee Safin
Everybody in the gardening world is aware of a grow tent, but for those who are still new or the definition is limited, a grow tent is an indoor greenhouse.
If you want me to answer the question “how should you set up your grow tent?”
To set up the grow tent you need to connect the poles at first. After that attach the fabrics. Zip them together and attach the support frame. This is how you should set up your grow tent.
It is beneficial for plants that require special attention, and it may be because the plant requires a different climate than yours or only pest and animal problems.
Let’s see what our experts say on “how to set up a grow tent?” Also, here we covered “how to set up grow tent ventilation System?”
Moreover, we will find out the best grow tent set-up strategy when we are done with the article.
Contents
- How to Set Up Grow Tent – Step By Step Guide
- Where Can I Buy a Grow Tent?
- Things to Keep in Mind While Buying A Grow Tent
- How to Set Up a Grow Tent Atmosphere System?
- How to Set Up Grow Tent Lighting System
- How to Choose the Right Light For Your Grow Tent
- How to Set Up a Grow Tent Ventilation System?
- System 1 – Setup For Small Tents
- System 2 – Setup For Large Tents
- What if Your Plant Need Further Drop in Temperature?
- What You Should Know About Multi-chamber Growing Tent?
- Additional Tips
- How To Choose The Right Fan?
- Wrapping Up
How to Set Up Grow Tent – Step By Step Guide
Step 1 – Connect The Poles
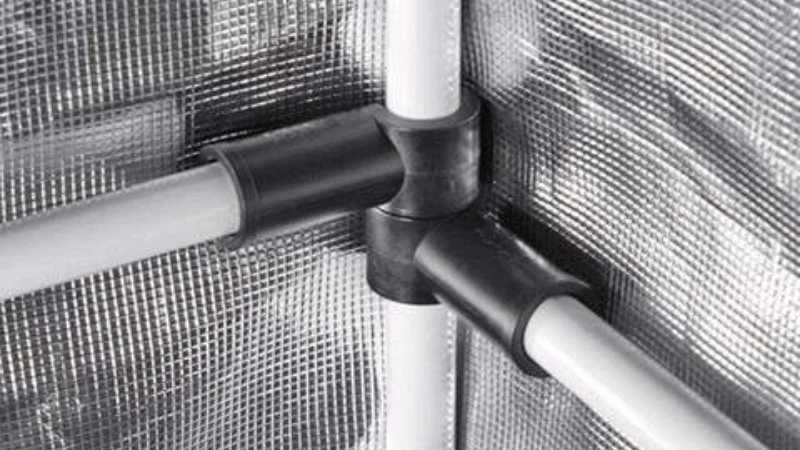
Layout the fabric on the floor and the poles alongside. Connect the ‘A’ poles to the corner pieces. So 4 A poles connected to a three-way corner piece in the shape of a square. Make 2 of these, one for the floor and one for the roof.
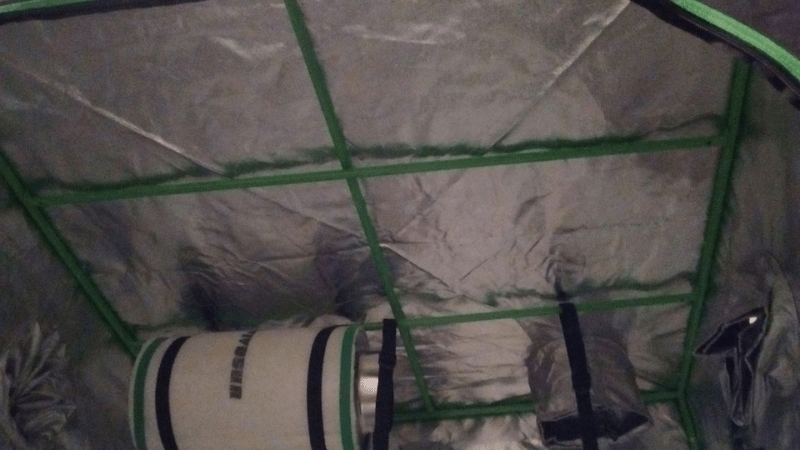
Step 2 – Place The Fabric Correctly
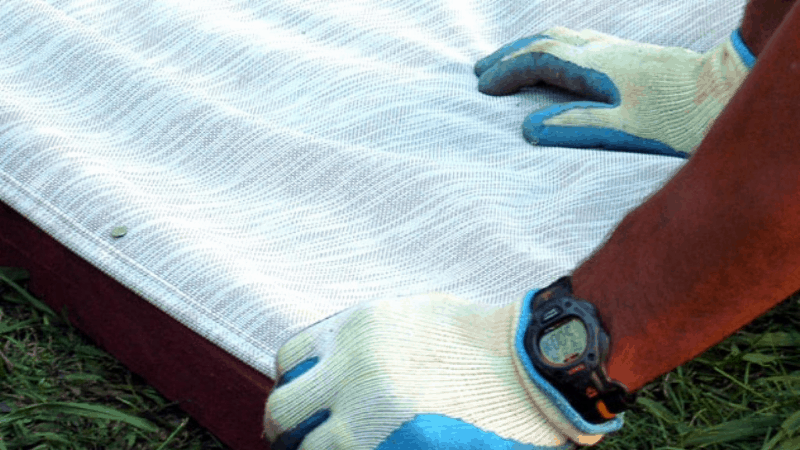
Now that you have the fabric laid out properly and the base frame, place them correctly on the floor to be inside the base fabric.
Step 3 – Connect The B Pole
Connect ‘B’ poles vertically in four corners of the base to the other end of the 90 degrees 3-way corner piece.
Step 4 – Connect C Pole to B Pole
Connect ‘C’ poles in B poles. By now, you should be having a frame standing with a base and four walls. You can insert an extension in the ‘C’ poles if you want more height.
Step 5 – Connect A Pole to C Pole
Now attach the A pole top frame that you have created in step 1 to the C poles or the extension if you added them.
Step 6 – Add Extension Fabric
The whole fabric lying on the floor pulls it up and gets a friend to help you hold it. Wrap it around and start zipping it from the bottom. Add the extension Fabric if you have attached the extension.
Step 7 – Zip Them Together
Now, you have to place the top fabric piece over the top frame and zip them together. Use a ladder or a chair if you have to but be careful with the frame.
Step 8 – Attach The Support Bars
Now, it is much easier to attach the support bars to the top frame. Now you have a garden tent up, and you need to set up a proper light and ventilation system so that your plants get the desired climate they require.
Note
For A, B, and C poles, you can use 19mm PVC pipes. You will get various types of connecting pieces that you can easily fit these pipes. Go crazy.
Instead of the fabric, you can use Mylar or Panda Film. Use the white or silver side as the interior. Do not forget to cut places for your air filter and other attachments. Use Velcro Tape and make a door.
Where Can I Buy a Grow Tent?
You can easily buy a whole ![]() . It is essential to choose the right to grow tent, especially for new gardeners. I would advise you to start with one specific plant.
. It is essential to choose the right to grow tent, especially for new gardeners. I would advise you to start with one specific plant.
Things to Keep in Mind While Buying A Grow Tent
Size
You should have good knowledge about the plant you will grow, like the size of the plant.
It is also indispensable to measure the space where the grow tent is going to be set up because you always need to leave space at the sides for additional attachments.
Based on these calculations, select the right size to grow the tent. Also, a room in the basement or ground floor is more suited for a grow tent.
Those places are naturally cold because hot air rises. The room temperature gradually increases as you move higher up in the building.
Optimal Atmosphere
The temperature required by plants will vary from the growing stage to flowering and vegging stages. Lights and ventilation setups are crucial for this.
Additional Items
Always keep the necessary tool at hand. I will also advise you to keep a temperature gauge, a timer for the lights, rolls of duct tape, a scissor, and some sponges.
Maintenance
A grow tent doesn’t end with the perfect setup. You have to donate time to your plants, keep the tent clean and maintain it. Regularly check for faulty issues.
Remember you are going to be having plants in soil pots inside the tent, which are going to need watering regularly.
How to Set Up a Grow Tent Atmosphere System?
A plant in its natural habitat gets a certain level of light, air, breeze, and humidity. Now that you have a grow tent all assembled, you will need to attach lights and a ventilation system.
Your tent’s requirement can differ vastly depending on the tent size and the type of plant you chose to grow.
The question is quite similar to how to maintain the humidity of the grow tent. If you want to know more about it check the following article – How to Control Humidity in Grow Tent?
How to Set Up Grow Tent Lighting System
If you want me to answer the question “how to set up grow tent lighting system?” in a sentence –
Take the light, attach/hang/set it at a suitable place, take the cord to the powerpoint and attach it. This is how you can set up grow tent lighting system simply.
Insert the light hangers in your Led light. Connect two rope ratchets to the top support frame of your grow tent.
Attach a pulley system in both the rope ratchets. Connect the two ends of the rope ratchets to your light hangers.
Use the pulley system to adjust the height of the light as required.
Setting up a proper light system can be very tricky if it’s a big tent. It would help if you were not using the same colour light spectrum throughout your plants’ life cycle.
Different colour light spectrums influence how your plants develop, grow, flower, and veg. In nature, plants receive the colour change in the light spectrum through the change in season.
Led lights for growth, tents are equipped with a set spectrum, which most plants need throughout their life cycle.
I would advise you to get LED lights with a variable spectrum.
This will give you more control to regulate the intensity of light and adjust the colour spectrum.
You can check our latest article on Best led lights for grow tent.
In fact, with proper regulation, you can mimic the sun rays and boost your plants’ growth cycle.
How to Choose the Right Light For Your Grow Tent
At first measure the area (example 3×3), then multiply it by 30. As an example for a 3×3 grow tent you need a light that should have a power capacity of (3×3)=9×30=270 watts. This calculation is applicable for the maximum exposure.
If you are not interested to calculate and measure, please visit the following article we have written for you which can lead you to the LED light you need for your grow tent. – Choose Your LED Light For Your Tent.
However, as you have already planned what you are going to grow, now is the time to calculate how much space your plants are going to need.
This will also vary depending on what size the plant is in the growth cycle. There is also the subject of how high your light setup is going to be.
Usually, a 30-50 watts bulb is capable of providing one square foot of light.
So if your plants are occupying a space of 3 foot by 3 foot, then your area is 3×3 = 9 square feet.
Given how high the light is going to be placed, you can safely assume 40 watts will cover per square foot. Therefore you will need 40×9 = 360 watts.
Watts don’t really tell the intensity of the light, but you can gain a certain accuracy level with this formula.
However, if you have a high budget and aim for high-tier LED lights, keep in mind that they have an even spread and high intensity in low watts, which means 20-35 watts bulb can provide light to per square foot of area.
You can always use a Spectrum Sensor to measure the intensity of your light.
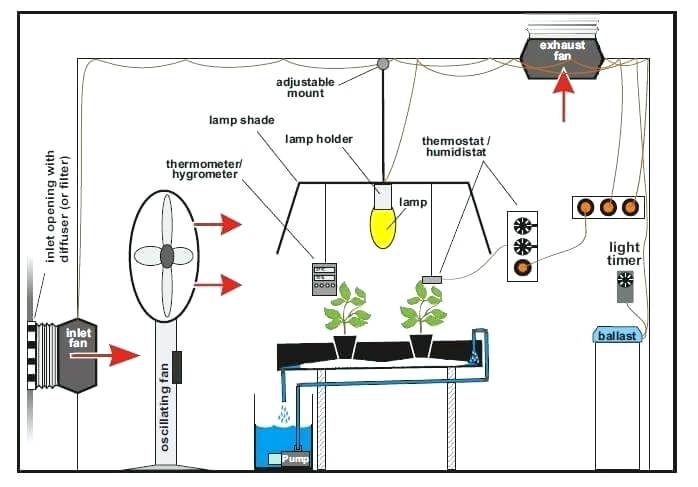
How to Set Up a Grow Tent Ventilation System?
A ventilation system is basically a fan attached to an air filter that you place strategically in your grow tent so that there is a smooth circulation of air for your plants.
There will be three parts to your ventilation system, the fan, duct, and filter.
The exhaust fan is of two types the extractor fan and the intake fan. An extractor will help remove the tent’s hot and humid air, whereas an intake fan will pump in fresh air from outside into the tent.
A duct is a long tube that connects the fan and filter, allowing you to create a much more flexible ventilation system for your tent. A filter is a carbon (activated carbon) air purifier.
An extractor ventilation system should always have access to the roof of your tent because the hot and used air that you need to eliminate rises up.
You may need portable air conditioners for grow tent. Check our linked article to know more about the portable AC for grow tent.
On the other hand, the intake ventilation system should have an opening at the bottom so that fresh air can come in and circulate all over the tent easily.
Assembling a ventilation system will differ significantly from one tent to another.
The ventilation system will significantly depend on the plant’s tent size, requirement, and grow tent’s location in the building.
System 1 – Setup For Small Tents
Extractor Vent
This is the simplest form of set-up and will not require a duct. You will require a carbon air filter, an exhaust fan, and a neoprene duct clamp.
This setup is more suitable for small tents. Place the air filter vertically on a flat surface with the face to attach the fan on top.
Now place the neoprene duct clam on top of the filter and mount the fan on the clamp to pull the air through the carbon filter.
Once you have placed the fan properly, use a screwdriver to tighten the neoprene clamp. Use a hook and a rope ratchet to attach the ventilation system in the support bars of the roof of your tent.
Make sure that the fan is just outside the tent and the filter is inside.
Use ducting if you find it difficult, but always place the filter on the tent’s top because hot air rises.
Note
It is highly advisable to use a neoprene clamp while attaching different sections of the ventilation.
It is often noted that the attachment between the fan and the filter does not always make a great seal, resulting in air loss. Also, shaky attachments will make more noise.
Intake Vent
Most grow tents have micro-mesh openings at the bottom for the inflow of air, which also helps with fresh air.
You can also attach an intake fan to pull fresh air from the outside into the tent. Don’t forget to apply ducting on both ends of the fan.
System 2 – Setup For Large Tents
Large tents will require more ventilation because they need more light, and light produces heat. Therefore the temperature inside the tent will rise fast.
Step 1 – Connect Ducting From Outside
The first step for this is to ensure that the lights remain cool to avoid heat spreading. For this, you will need to connect ducting from outside the tent to the light holder, and we will name it Duct A.
Step 2 – Ensure Smooth Passage
Next, connect another duct, Duct B, to the other end of the light holder and take it out of the other side of the tent. The whole set-up should be such that there is a smooth passage for airflow through Duct A and Duct B passing by the lights holder.
Step 3 – Attach the Exhaust Fan
Now you can attach an extractor fan in Duct B so that air is pulled in from outside the tent through the light holder before being extracted.
This will keep the lights cooler, drastically lowering the temperature inside the tent.
Additionally, you can also attach an intake fan in front of Duct A to increase the ventilation if your lights still require cooling.
What if Your Plant Need Further Drop in Temperature?
For large tents, use setup 1 and 2 if your plants need a further drop in temperature and consider the fans’ drop in efficiency when using ducts.
The drop in efficiency will depend on how long your ducts are.
Make additional support with 19mm PVC pipes to hang your ventilator if you need but do not put too much weight on your tent’s support bars. It can come crashing down.
Arrange all the wiring of your exhaust fans, Led lights, and any additional wiring. Cover it properly with duct tape and keep it in an unreachable and dry place.
Remember, you are going to grow plants here, which means you will be watering them regularly. The water can create a short circuit.
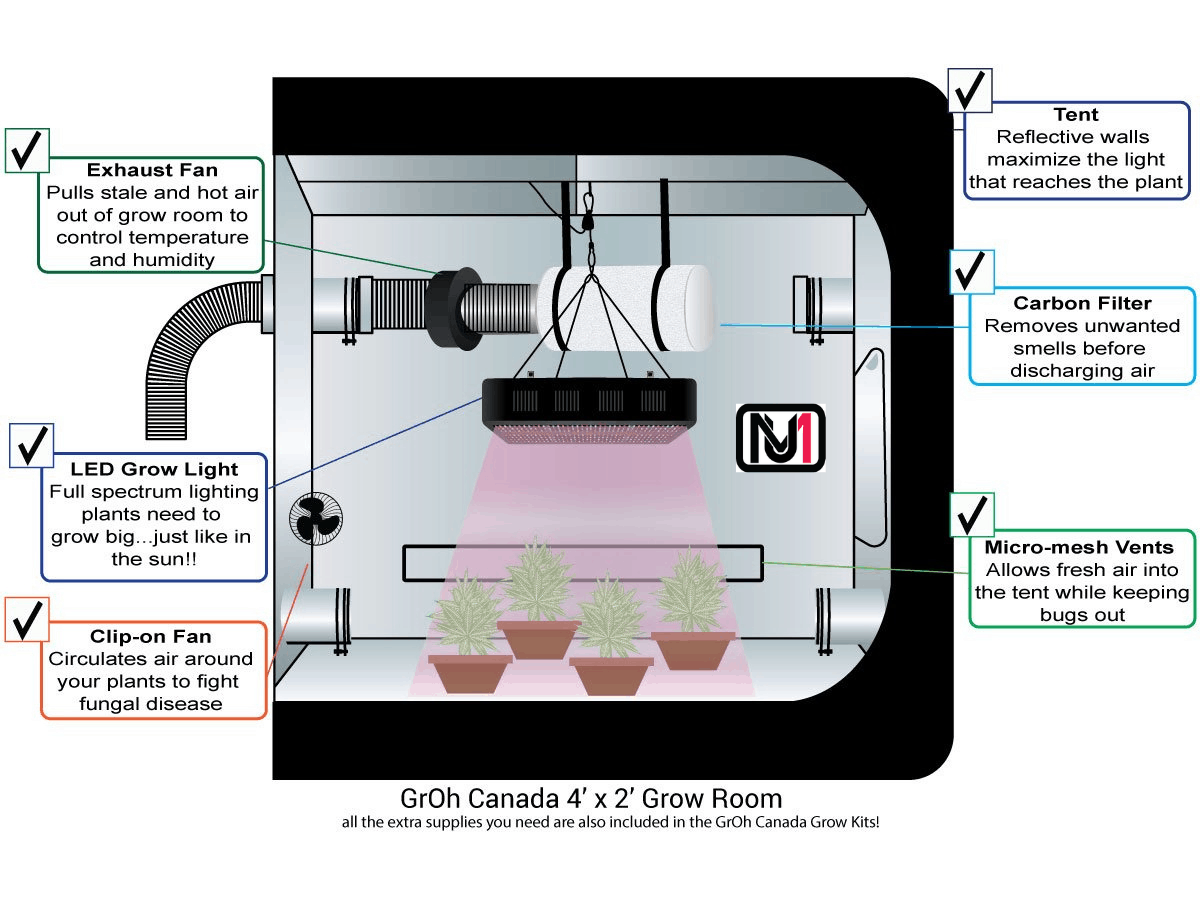
What You Should Know About Multi-chamber Growing Tent?
Here’s a diagram of a multi-chamber growing tent. This should help you get a much clear picture of how the ventilation system can be arranged.

Additional Tips
- Attach a temperature gauge to monitor the temperature inside the tent.
- Attach a timer for your lights.
- To increase the humidity in your tent, soak some sponges in water and leave them on a bowl inside the tent.
- You can place an oscillating fan inside the tent. This fan, when turned on, will circulate the air and provide a breeze for your plants. This can be good for the stems of some plants because the breeze strengths them. However, it can also damage some plants.
How To Choose The Right Fan?
For tents of size 2″ x4″ x5″, you need approximately 80-120 CFM of go for a 250-watt fan. Size 3″ x3″ x6″ tents will require 108-162 CFM or a 400-watt fan. Tents with size 3.5″x3.5″x6.5″ will require 160-250 CFM or 600 watts, and tents with size 4″x4″x7″ will need 250-336 CFM or 1000 watts.
To reduce your pressure we wrote an article on the best fan for grow tent, you can check it.
Usually, while purchasing a grow tent, you can opt for a complete package full of a ventilation system and lights along with the tent, which you need to assemble.
However, it can be confusing for people looking to buy a ventilation system separately, especially for new gardeners. This can become relatively easy with a little math.
Most fans come with a ‘CFM’ rating. CFM stands for Cubic Feet per Minute. So a fan with 250 CFM means that it can filter a volume of 250 cubic feet in a minute.
Now you have to find your grow tent’s volume and what fan is best suited for it.
To calculate your grow tent’s volume, you need to multiply your grow tent’s height, width, and breadth.
Here is a brief idea about what fan you need even if the CFM rating is unavailable in your country.
Your fan will have a loss in its efficiency system depending on how long the ventilation system is. When you set up a ventilator system, air will flow from the fan through the passage.
Because of this flow, the fan loses some efficiency. Depending on how long air has to travel from the fan through the duct, you will lose 20% to 40% of the fan’s efficiency.
This means if you have a short passage and lose only 25% efficiency, then your fan’s capability if it is marked 250 CFC will be 250×75% = 187.5 CFC.
Do not panic if you find it challenging to match the numbers and find a suitable fan for your tent.
There are various tweaks and life hacks, which I will also cover. These can be applied to get the most desired atmosphere.
Exhaust fans also come in various sizes like 4″, 6″, or 8″. This is the diameter of the fan.
Most grow tents have a size 6″ opening; therefore, 6″ fans are more advisable.
However, some converters will help you change the size of a 6″ fan to a 4″ fan, so do not overstress it.
Wrapping Up
We have covered a vast section of information here to add customized options to your grow tent. I hope you got your answer on “how to set up grow tent?”
Remember, your tent size and its internal atmosphere will solely depend on what plant you are growing. There’s always going to be mud, soil, and leaves in your tent.
Don’t forget to clean and take good care of your plants consistently.


About Lee Safin
Lee Safin was born near Sacramento, California on a prune growing farm. His parents were immigrants from Russia who had fled the Bolshevik Revolution. They were determined to give their children a better life than they had known. Education was the key for Lee and his siblings, so they could make their own way in the world. Lee attended five universities, where he studied plant sciences and soil technologies. He also has many years of experience in the U.S. Department of Agriculture as a commercial fertilizer formulator.
Get FREE Gardening Gifts now. Or latest free toolsets from our best collections.
Disable Ad block to get all the secrets. Once done, hit any button below