Setting up a grow tent is faster than most people expect — and the results are immediate. If you want to know how to set up a grow tent correctly, the answer comes down to sequence: frame first, then canvas, then equipment, then environment. Getting that order right means you never have to disassemble half your setup to reach something installed out of turn. If you're just getting started with indoor growing, our gardening tips section is a solid place to build your foundation before diving into the specifics here.
Grow tents have changed indoor gardening by making serious environmental control accessible to everyday growers. You get a light-proof, reflective enclosure with built-in ports for ducting, cables, and fans — all without custom construction or a dedicated room. Whether you're growing vegetables, herbs, or flowers indoors, the setup process is the same at its core. Understand the anatomy, gather your equipment, and follow the right assembly order.
This guide walks through every stage — from choosing your location and building the frame to dialing in ventilation and humidity. You'll also find a breakdown of common mistakes, an honest look at the pros and cons, and a maintenance strategy that keeps your setup performing well over time.
Contents
- Why Grow Tents Changed Indoor Gardening
- Everything You Need Before You Start
- Is a Grow Tent Right for Your Setup?
- How to Set Up Your Grow Tent, Step by Step
- The Real Advantages and Drawbacks of Grow Tents
- Setup Errors That Cost You Your Harvest
- Keeping Your Setup Running Season After Season
- Frequently Asked Questions
- Final Thoughts
Why Grow Tents Changed Indoor Gardening
Before grow tents became widely available, indoor growers had two realistic options: convert a closet or build a dedicated grow room. Both required significant investment — insulation, reflective paint, custom electrical work, and usually some permanent construction. Grow tents disrupted that model entirely. A quality tent gives you the same light-proof, reflective environment at a fraction of the cost, and you can disassemble it, move it, or scale it as your needs change.
The practice of indoor gardening spans everything from hobby herb cultivation to full-scale hydroponic production. According to Wikipedia's overview of indoor gardening, controlled-environment growing has grown steadily as growers seek independence from seasonal limitations. Grow tents sit squarely in that movement: accessible enough for beginners, capable enough for serious hobbyists who want consistent harvests year-round.
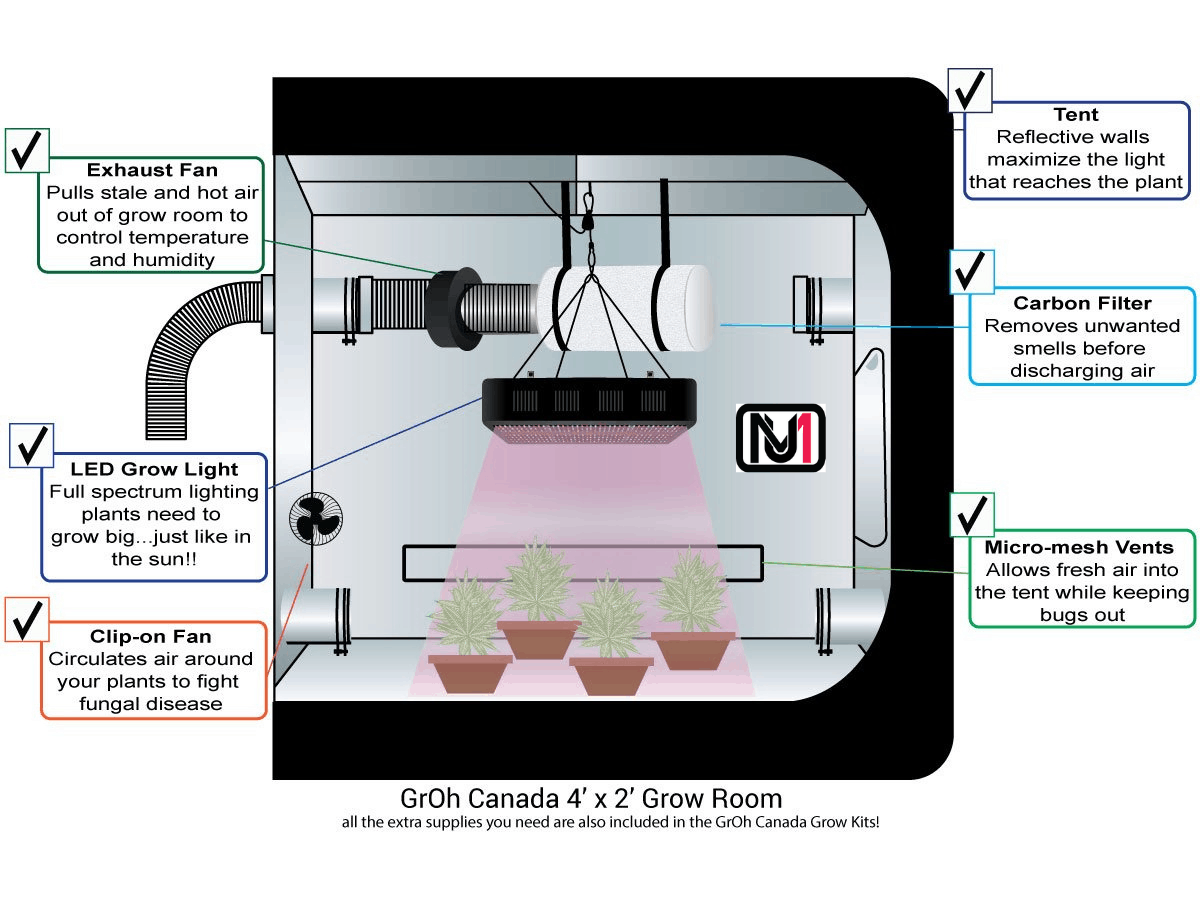
The Anatomy of a Grow Tent
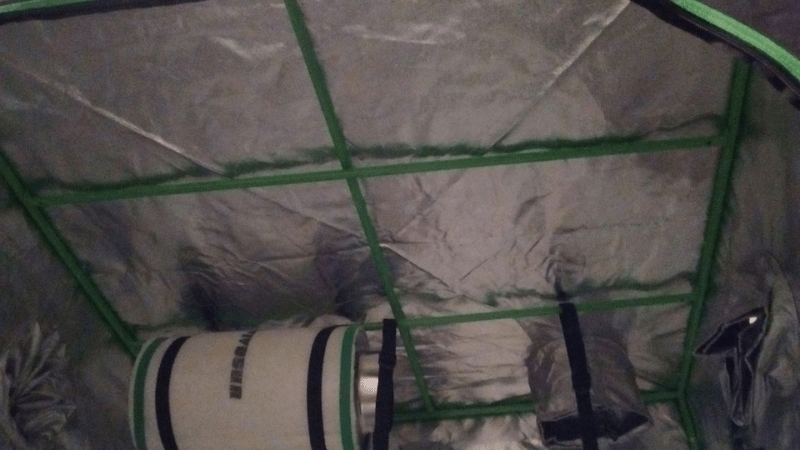
Every grow tent shares the same fundamental architecture. A metal pole frame forms the skeleton — typically steel or aluminum — covered by a thick, light-proof canvas exterior. The interior is lined with highly reflective Mylar, usually rated at 95% reflectivity or higher, which bounces light back onto your plants rather than wasting it on the walls. Pre-cut ports on the sides and top accommodate ducting, power cables, and clip-on fans. The floor is usually waterproof and removable, making cleanup between grows straightforward.
Everything You Need Before You Start
Walking into a grow supply store without a list is a reliable way to spend twice what you planned. Before you assemble anything, get your full equipment checklist in place. Most setups share the same core components regardless of what you're growing or how large your tent is.
Core Equipment
| Component | Purpose | Recommended Spec |
|---|---|---|
| Grow Tent | Enclosed, light-proof growing environment | 600D canvas, 95%+ Mylar lining |
| Grow Light | Primary light source for plant growth | Full-spectrum LED or HPS |
| Inline Fan + Ducting | Air exchange and heat removal | Sized to tent volume (CFM rating) |
| Carbon Filter | Odor scrubbing from exhaust air | Matched CFM to your inline fan |
| Oscillating Clip Fan | Internal air circulation | 6–8 inch clip-on model |
| Digital Timer | Automates light on/off cycles | 24-hour mechanical or programmable |
| Thermometer/Hygrometer | Monitors temperature and humidity | Combo digital unit with min/max memory |
| Grow Medium + Containers | Root support and nutrient delivery | Soil, coco coir, or hydroponic system |
| Ratchet Hangers | Adjustable light suspension | Rated for your light's weight |
Helpful Additions
A few extras make a measurable difference in your final results. A pH meter is essential if you're working with liquid nutrients or a hydroponic system — pH drift is one of the most common hidden causes of nutrient lockout, and it's impossible to detect without testing. A trellis net helps you manage canopy height and spread plants evenly under your light. If your room runs cold, a seedling heat mat keeps germination rates consistent. None of these are strictly required for your first grow, but skipping them often leads to the same avoidable problems over and over.
Is a Grow Tent Right for Your Setup?
Grow tents work well for most situations, but they're not the universal answer for every grower. Being honest about your space, goals, and budget upfront saves you from investing in a setup that doesn't actually fit your situation.
When a Grow Tent Makes Sense
Use a grow tent when you need precise light control, when odor management matters in your living space, or when your room conditions are too variable for consistent plant health. Tents are the right call for apartment growers, basement setups, and anyone starting with a modest budget who still wants professional-level environmental control. They handle seedling propagation, vegetative growth, and flowering equally well — often in the same unit across different cycles.
When to Consider Something Else
If you're growing at commercial volume, a purpose-built grow room becomes more cost-efficient over time. Tents also have fixed height ceilings, which can constrain tall-growing varieties like indeterminate tomatoes or long-vining plants. And if dimensional flexibility matters more to you than portability or speed of setup, a custom-built enclosure gives you control that a standard tent can't match.
How to Set Up Your Grow Tent, Step by Step
Here's where most guides go vague. This section gives you the actual sequence — in the order that makes physical sense — so you're not reaching into a cramped tent to install something that should have gone in first.
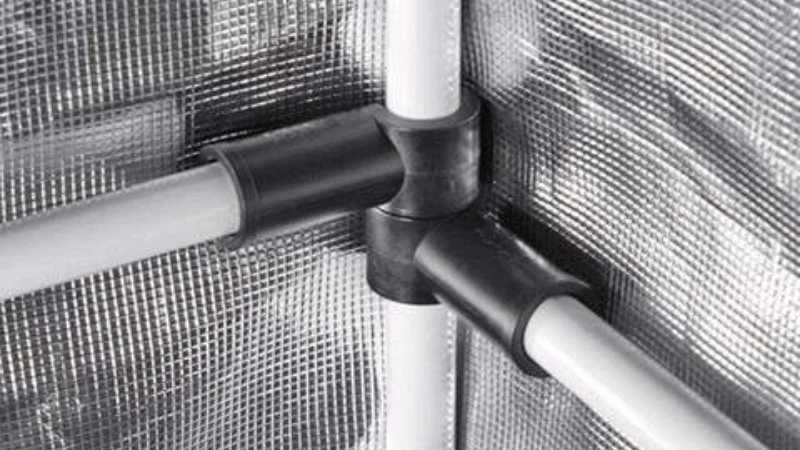
Step 1: Assemble the Frame
Lay all your poles out before snapping anything together. Most manufacturers color-code them or label them with letters, but spend a minute reading the instructions to confirm the orientation before you assume. Connect horizontal poles to vertical corner posts first, building the base rectangle before adding the upright posts. Work on a flat, level surface so the frame stays square throughout assembly. Once all four uprights are in place, lock in the top horizontal bars to complete the cube structure. Give each joint a firm push to confirm it's fully seated — loose connections create flex in the frame that becomes a problem when you're hanging lights.
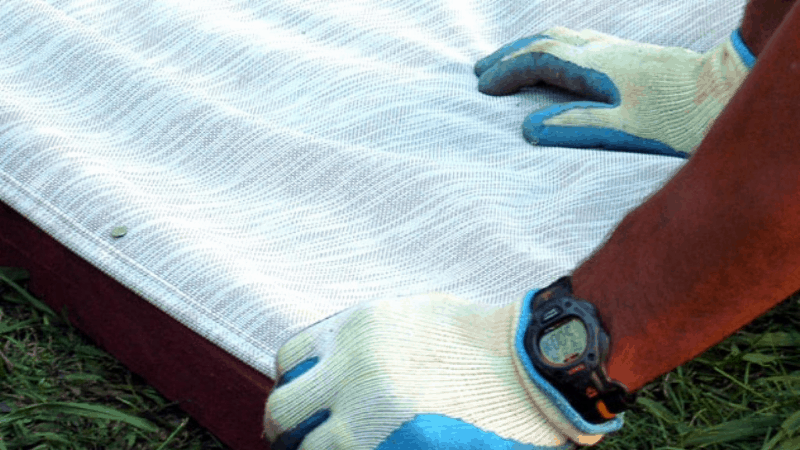
Step 2: Attach the Canvas
With the frame standing, slide the canvas over the top and work it down the sides. Most tents have a zipper along one bottom edge that helps you seat the canvas correctly around the base. Pull it snug at each corner — loose canvas can block port openings and create light leaks at the seams. Once positioned, zip the door panel fully shut and inspect for any gaps where poles contact the canvas. Even small light leaks disrupt photoperiod plants significantly during their dark cycle. Patch any gaps with black photographic tape or adjust the canvas alignment until it sits flush against the frame at every point.
Step 3: Install Support Bars and Hang Lights
Most tents include one or two horizontal support bars that span the top interior frame. These are your primary mounting points for lights, fans, and carbon filters. Install them before bringing any heavy equipment inside the tent — clipping a grow light onto a support bar while crouched in a cramped space is the kind of frustration that's entirely avoidable. Use the included ratchet hangers to suspend your grow light at the manufacturer's recommended distance from your future canopy. For most full-spectrum LEDs, that's 18–24 inches during vegetative growth, and slightly closer during flowering once plants have established.
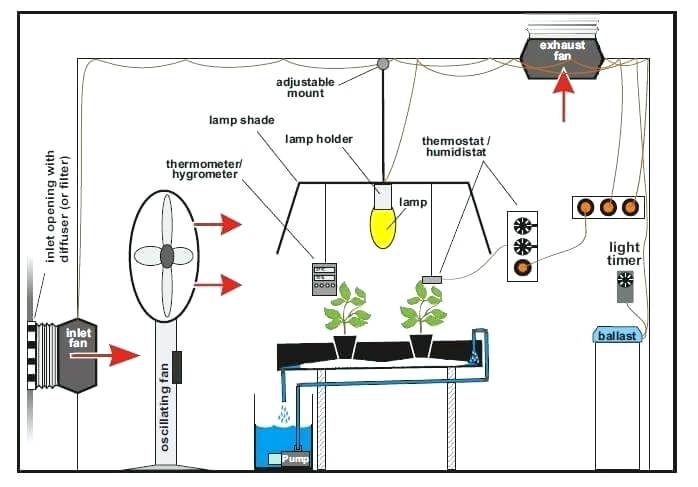
Step 4: Set Up Ventilation
Ventilation is the most technically involved part of the setup, but the underlying logic is simple: hot, stale air exits through the top and fresh air enters through the bottom. Mount your inline fan inside the tent near the top, connect it to your carbon filter with a short duct collar, then route the exhaust ducting out through one of the upper ports. For a thorough walkthrough of fan placement and mounting techniques, see our guide on how to hang an exhaust fan in a grow tent. Your oscillating clip fan goes low on the frame, pointed diagonally across the canopy to keep air moving and eliminate stagnant hot spots near the light.

The Real Advantages and Drawbacks of Grow Tents
Grow tents offer genuine advantages over improvised indoor setups, but they come with real limitations worth understanding before you commit to a purchase.
On the positive side, tents give you complete light isolation — critical for any photoperiod plant where a stray hour of ambient light can trigger the wrong growth stage. The reflective Mylar interior measurably improves light efficiency; some growers see up to 30% better light distribution compared to an unlined closet or spare room. Setup is fast, the components are standardized and modular, and the entire system breaks down easily for cleaning or storage between grows. For the price, very few indoor growing solutions come close.
On the downside, tents have fixed dimensions. If your plants outgrow the tent height — which can happen quickly with vigorous varieties — you're managing light burn and compressed growth in a space that offers limited adjustment. Canvas zippers develop stress points over time and become a source of light leaks in older tents. And in warm climates or rooms without air conditioning, maintaining the right temperature inside a sealed enclosure requires a more powerful ventilation system than most beginners initially budget for.
Pro Tip: Run your lights and fans for a full 24 hours before introducing any plants. You'll catch heat spikes, confirm your thermometer readings, and identify any light leaks while there's nothing at stake.
Setup Errors That Cost You Your Harvest
The most damaging grow tent mistakes aren't about equipment quality — they're about sequence, oversight, and skipped steps that seem unimportant until they aren't.
Skipping the dry run. Putting plants into a tent that hasn't been tested for temperature and humidity behavior is a gamble you'll often lose. Run your full system for at least 24 hours before any plants go in. You'll discover whether your fan is undersized, whether your lights are running hotter than the spec sheet suggests, or whether your ducting is routed in a way that traps heat near the canopy.
Ignoring humidity management. Seedlings need high humidity around 65–70% relative humidity to establish strong root systems. Flowering plants need it lower — closer to 40–50% — to prevent mold from taking hold in dense canopy zones. Humidity that spikes during late flower is one of the fastest paths to losing an entire crop. If you're unsure how to dial in moisture levels inside your tent, our guide on how to control humidity in a grow tent covers every practical method in detail.
Overlooking cable management. Dangling power cables near irrigation water or sitting on a wet tent floor are a serious safety hazard. Route all electrical cables through the designated port openings and use velcro ties to bundle and elevate them. It takes five minutes and removes a risk that grows with every watering session.
Using the wrong fan size. Your inline fan's CFM rating needs to match your tent volume. The standard rule is to turn over the full tent air volume at least once per minute. An undersized fan can't keep up with heat load from the light, and temperatures climb faster than any plant can tolerate.
Keeping Your Setup Running Season After Season
A well-maintained grow tent can run for several years before any major components need replacing. The growers who get the most out of their setups build good maintenance habits from the first grow rather than reacting to problems after they develop.
Between grows, wipe down the interior Mylar with a diluted hydrogen peroxide solution — a 3% dilution is effective and won't damage the reflective surface. This eliminates mold spores and pest eggs that survive in corners and seams. Inspect zipper tracks for debris and grit; a contaminated zipper is the most common cause of new light leaks in tents that were previously sealed. Check all duct connections for loosening clamps, and confirm your carbon filter is still within its effective lifespan. Most carbon filters last 12–18 months under normal use, but high-humidity environments shorten that significantly. Replace the media before you notice odor breakthrough rather than after.
On the lighting side, track your LED panel's running hours. Quality LED grow lights maintain output for 50,000 hours or more, but diode brightness degrades gradually. If you find yourself increasing intensity to get the same plant response you used to get at lower settings, that's your signal the panel is aging. Running an old light harder than it should go increases heat load and power consumption without improving results — replacement at that point is the more efficient choice.
For ongoing ventilation performance, clean your inline fan blades every few months. Dust accumulation on fan blades can reduce effective airflow by 10–20% without any audible warning — your fan sounds the same, but your tent runs warmer than it should. A clean system is a predictable system, and predictability is what separates consistent harvests from guesswork.
Frequently Asked Questions
How long does it take to set up a grow tent for the first time?
Most growers complete a full setup — frame, canvas, lights, fans, and ventilation — in two to four hours. If it's your first time working with the equipment, budget closer to four hours as you reference instructions and figure out port placement. Once you've done it once, subsequent setups take half that time or less.
What size grow tent is best for a beginner?
A 2x4 foot tent is the most popular starting point for new growers. It's large enough to support four to six medium-sized plants, fits in a bedroom corner or closet, and pairs well with a standard 400–600W grow light. If you have the space, a 4x4 gives you more flexibility for plant training and is more forgiving as you're learning canopy management techniques.
Do I need a carbon filter in my grow tent?
Yes, if odor control is any concern in your living space. Carbon filters scrub volatile compounds from exhaust air before it exits the tent. Even plants that seem mild-smelling during vegetative growth can produce noticeable odors in flowering. A carbon filter matched to your inline fan's CFM rating is the standard and most reliable solution.
How do I find and fix light leaks in my grow tent?
With your lights on inside the tent, zip everything shut and step into a darkened room. Look for any visible light escaping around zippers, port openings, or seam junctions. Even a thin sliver of light matters for photoperiod plants during their dark period. Seal any gaps with black photographic tape or foam weatherstripping before your first grow cycle begins.
What temperature should I maintain inside a grow tent?
The target range is 70–85°F (21–29°C) during the light cycle and 60–75°F (15–24°C) during the dark cycle. Sustained temperatures above 85°F stress most plants and create conditions that favor pest and mold activity. Always measure temperature at canopy height, not at the floor — that's where your plants are actually experiencing the heat.
Can I set up a grow tent in an apartment?
Yes. Grow tents are among the most apartment-compatible indoor growing systems available. They're fully self-contained, the carbon filter handles odors, and they require no permanent modifications to walls or ceilings. A 2x2 or 2x4 tent fits in a standard closet with room to spare. Check your lease terms regarding indoor growing before you start, since policies vary by building and location.
How often should I clean the inside of my grow tent?
Clean the tent thoroughly between every grow cycle. Wipe the Mylar walls with a 3% hydrogen peroxide solution, let the surfaces dry completely before introducing new plants, and inspect for signs of mold or residual pest activity. Consistent cleaning between cycles prevents cross-contamination from one grow to the next and keeps your reflective surfaces performing at full efficiency.
Final Thoughts
You now have a complete picture of how to set up a grow tent from the ground up — the sequence, the equipment, the mistakes to avoid, and the habits that keep your setup productive long-term. The best next step is to pick your tent size, gather your equipment using the table above as your checklist, and run a full 24-hour dry test before your first plants go in. That single habit eliminates most of the problems that derail first-time growers before they ever get started.


About Lee Safin
Lee Safin was born near Sacramento, California on a prune growing farm. His parents were immigrants from Russia who had fled the Bolshevik Revolution. They were determined to give their children a better life than they had known. Education was the key for Lee and his siblings, so they could make their own way in the world. Lee attended five universities, where he studied plant sciences and soil technologies. He also has many years of experience in the U.S. Department of Agriculture as a commercial fertilizer formulator.
Get FREE Gardening Gifts now. Or latest free toolsets from our best collections.
Disable Ad block to get all the secrets. Once done, hit any button below